Maestro 3D Easy Dental Scan - Manuale Utente
Introduzione all'utilizzo del software Maestro 3D Easy Dental Scan
Lo scopo di questo document è quello di introdurre, in modo semplice e veloce, l'utente all'uso del software di scansione Easy Dental Scan Software. Si consiglia di leggere attentamente questo documento prima di utilizzare Easy Dental Scan. Maestro Easy Dental Scan è il software di scansione ideato per gli scanner della linea Maestro 3D. Il software permette l'acquisizione automatica con un solo click di oggetti dentali e la creazione della superfice 3D. Il software innovativo garantisce prestazioni eccezionali, sfruttando appieno il calcolo parallelo offerto dalle più recenti tecnologie disponibili multicore e multithreading sul mercato.
UAC - Controllo Account Utente
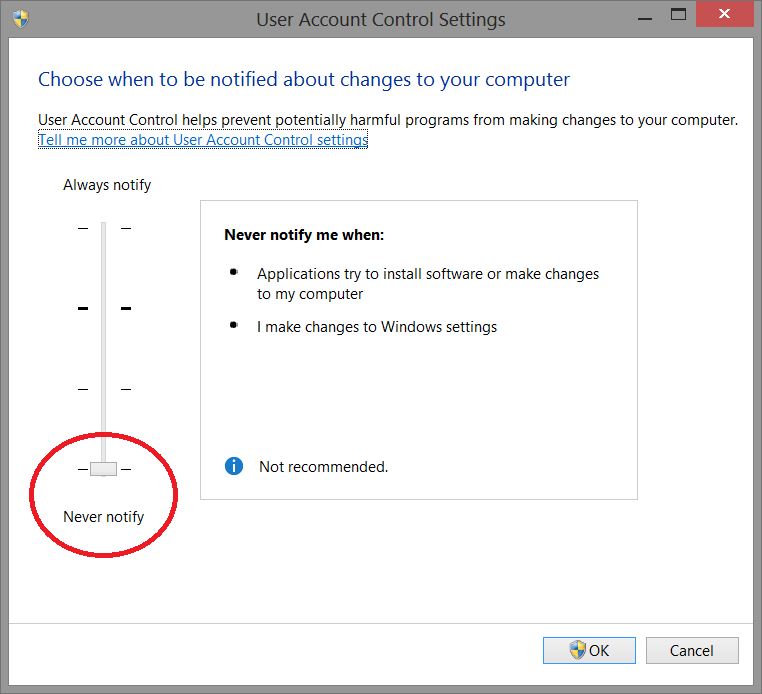
Per non avere difficoltà e limitazioni nell'utilizzo del software è necessario settare lo slider dell'UAC - Controllo Account Utente al minimo come mostrato nella figura sottostante.
Per accedere alla finestra di settaggio: Pannello di controllo -> Account Utente -> Cambia impostazione Controllo Account Utente.
Diritti di Amministratore
Per eseguire correttamente il software è necessario settare correttamente i diritti di amministratore.
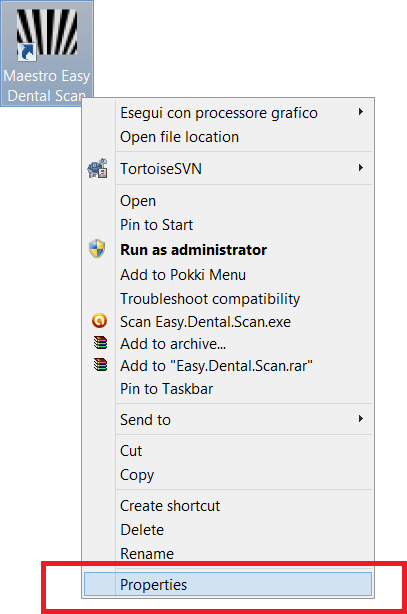
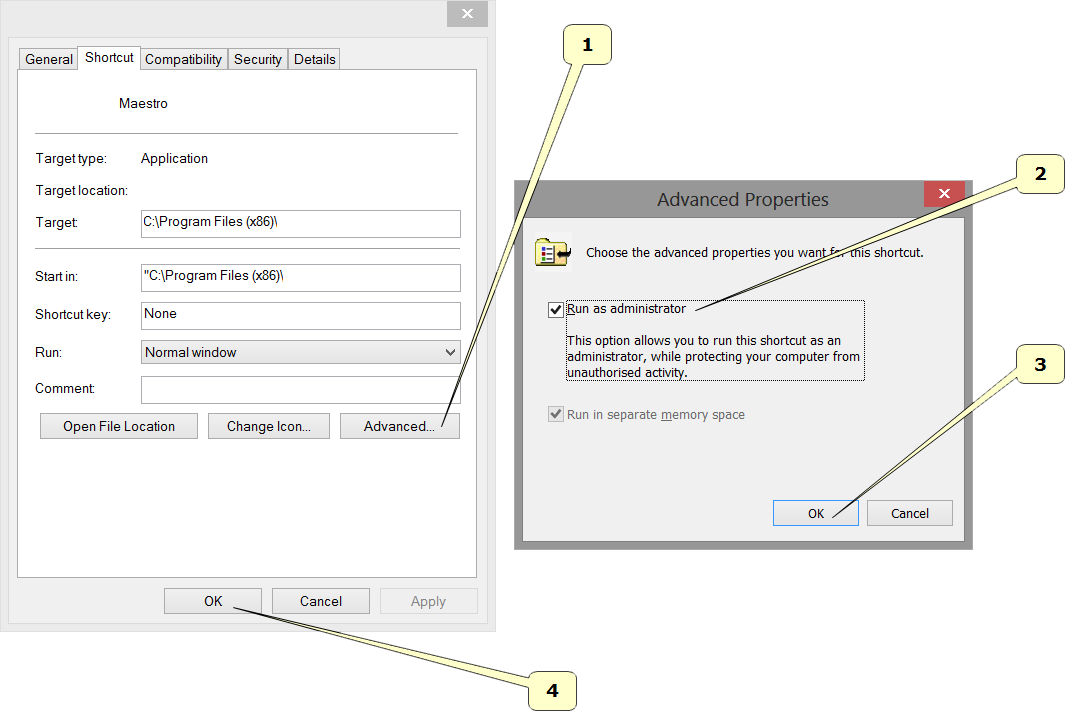
Seguire le istruzioni come indicato nelle figure sottostanti.
Tasto destro del mouse sull'icona del software per attivare il menù contestuale e selezionare la voce proprietà.
Seguire i passi come indicato nella sequenza da 1 a 4.
- Premere il pulsante Avanzate.
- Spuntare la voce Esegui come Amministratore.
- Premere il pulsante Ok.
- Premere il pulsante Ok.
Interfaccia Utente
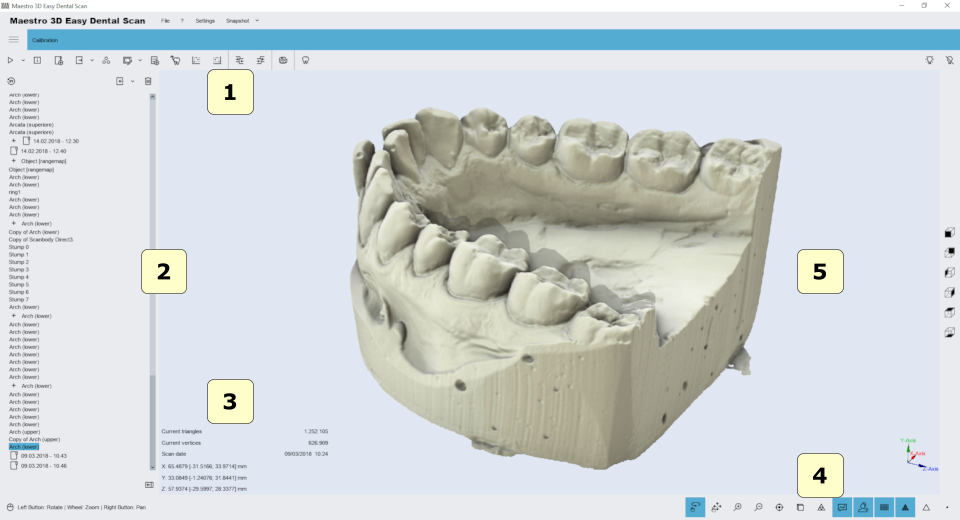
La figura sotto mostra come appare l'interfaccia utente del software.
- 1) Toolbar Principale.
- 2) Tree Area.
- 3) Area Informazioni.
- 4) Toolbar Inferiore.
- 5) Area di Visualizzazione.
Toolbar Principale
La toolbar principale permette di accedere a tutte le funzionalità dell'Easy Dental Scan Software.
- 1)
 Nuova Acquisizione - Inizia una nuova scansione.
- 2)
 Stato Scanner - Attiva la finestra che monitorizza lo stato hardware del sistema.
- 3)
 Nuovo Gruppo - Aggiunge un nuovo gruppo nell'albero delle scansioni (Tree). E' possibile spostare gli elementi della Tree dentro/fuori un gruppo mediante il drag&drop del mouse.
- 4) Esporta (Z Axis) - Esporta il file selezionato secondo l'asse Z. Si può selezionare anche l'opzione Esporta (Asse Y).
- 5) Postprocessa (converte i dati acquisiti in un modello 3D) - La funzione si abilita quando viene selezionato un elemento non postprocessato, questa operazione
puo' richiedere qualche minuto e converte i dati scansionati dallo scanner in una geometria triangolare.
- 6) Edita - Modifica gli elementi selezionati. Questa operazione e' utile per rimuovere gli artefatti dovuti alla scansione, per rimuovere la plastilina scansionata, per tappare i buchi, decimare i modelli scansionati, etc.
- 7) Importa uno scanbody dalla libreria.
- 8) Registra elementi sull'arcata - Attiva la procedura di allineamento automatico dei monconi.
- 9) Registrazione manuale.
- 10)
 Free Measures:
- misure punto-punto.
- misure di angoli.
- 11) CAD - invia gli elementi selezionati al software CAD.
- 12) Viste:
- vista frontale.
- vista posteriore.
- vista lato destro.
- vista lato sinistro.
- vista dall'alto.
- vista dal basso.
- 13) Stato del proiettore.
- 14)
 Uscita.
Il tab della calibrazione è descritto qui: Calibration.
Toolbar Inferiore
La toolbar inferiore è l'area dello schermo che visualizza una barra di progresso durante ogni computazione e permette attraverso appositi pulsanti di cambiare le proprietà di visualizzazione.
- 1) ingrandisci [Key PGDown]/rimpicciolisci [Key PGUp].
- 2) mostra/nascondi trackball.
- 3) resetta trackball [Key R].
- 4) proiezione parallela [Key O], proiezione prospettica [Key P].
- 5) smooth shading [Key S], flat shading [Key F].
- 6) mostra/nascondi triangoli, bordi [Key E], punti [Key V].
Area di Visualizzazione / Editing e Area di Informazione
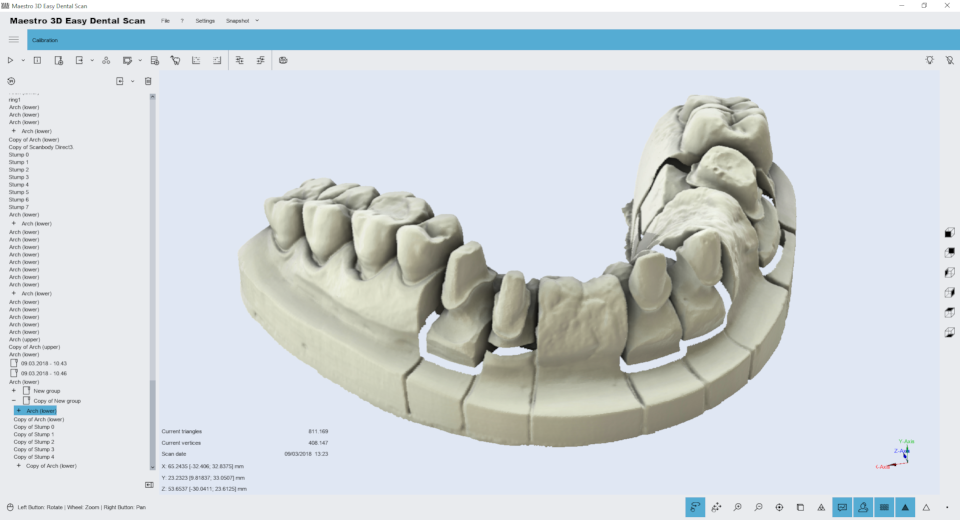
L'area di visualizzazione ed editing è l'area della finestra dove i modelli sono disegnati e visualizzati e dove le operazioni di editing sono consentite.
Nell'area di visualizzazione è possibile visualizzare\creare le basi virtuali, l'occlusione fra la mascella e la mandibola, visualizzare le misure dei denti, la lunghezza dell'arco e realizzare e mostrare il setup virtuale.
Per esaminare i modelli visualizzati, i parametri della camera (posizione, scalatura, rotazione) possono essere settati attraverso uno strumento chiamato trackball.
La trackball è uno strumento semplice da utilizzare, Premere e trascinare il tasto sinistro per ruotare intorno al modello. Ruotare la rotellina centrare del mouse per effettuare lo zoom. Premere e trascinare il tasto destro per muovere la camera.
L'area di informazione è la parte dello schermo che mostra le informazioni relative all'elemento selezionato.
Tree Area
La Tree Area contiene tutti i modelli scansionati. La Tree Area ha una organizzazione ad albero e mediante l'utilizzo di gruppi consente di tenere un ordinamento dei modelli scansionati. Per selezionare un modello della Tree Area cliccarci sopra con il tasto sinistro del mouse. I modelli selezionati verranno visualizzati sulla Visualization Area. Per selezionare più modelli cliccare tenendo premuto il tasto CTRL.
La Tree Area può contenere i seguenti elementi:
| |
Moncone |
| |
Arcata Superiore |
| |
Arcata Inferiore |
| |
Gengiva Superiore\Inferiore |
| |
Waxup Superiore\Inferiore |
| |
Relazione Mascellare\Mandibolare |
| |
Rangemap |
| |
Gruppo |
Per ognuno di questi elementi e' associato un insieme di operazioni accessibili tramite le icone abilitate nella Main Toolbar. Queste consentono di accedere alle funzioni di post processamento relative a quel particolare elemento.
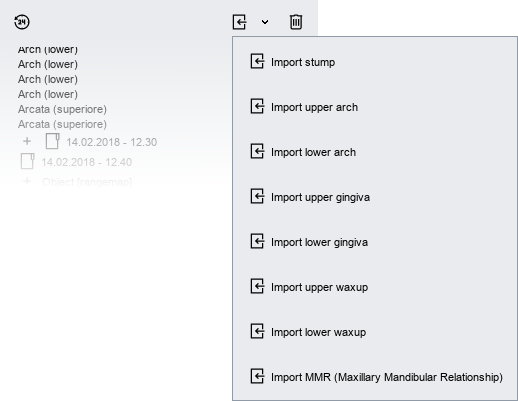
Accedendo al menù a tendina come mostrato nella figura seguente, è possibile importare nella tree area del software il file in formato *.STL\é.PLY relativo all'elemento selezionato.
Oggetti Scansionabili
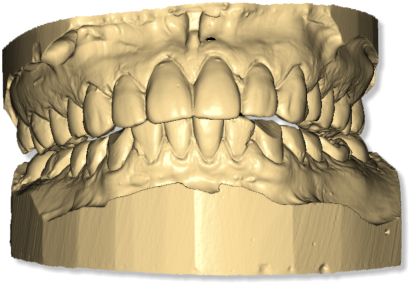
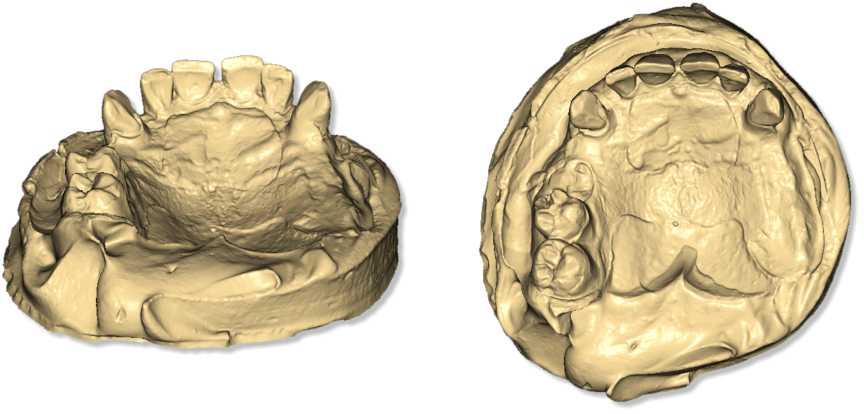
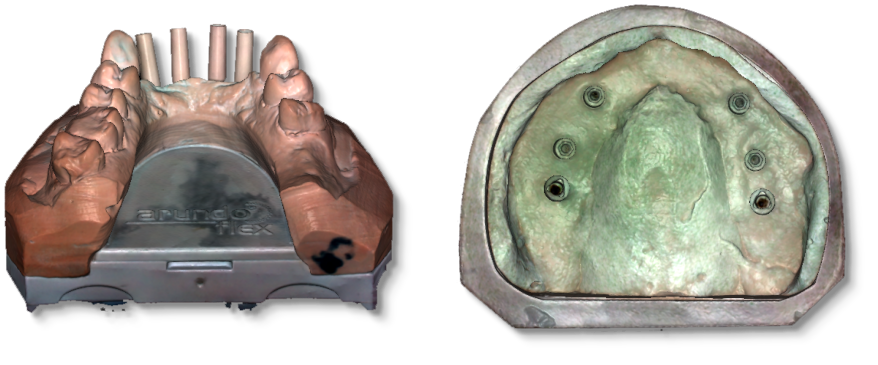
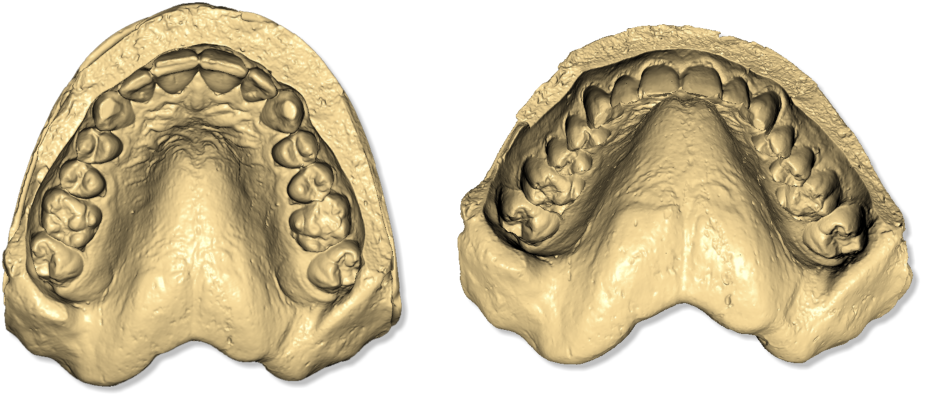
Alcuni esempi degli oggetti scansionabili:
- Relazione Mascellare/Mandibolare
- Arcata Superiore\Inferiore
- Altri esempi di arcate dentali
- Impronte
- Monconi
Parametri di Scansione
Per iniziare la procedura di scansione cliccare sul pulsante ![]() Nuova acquisizione presente nella toolbar principale.
Nuova acquisizione presente nella toolbar principale.
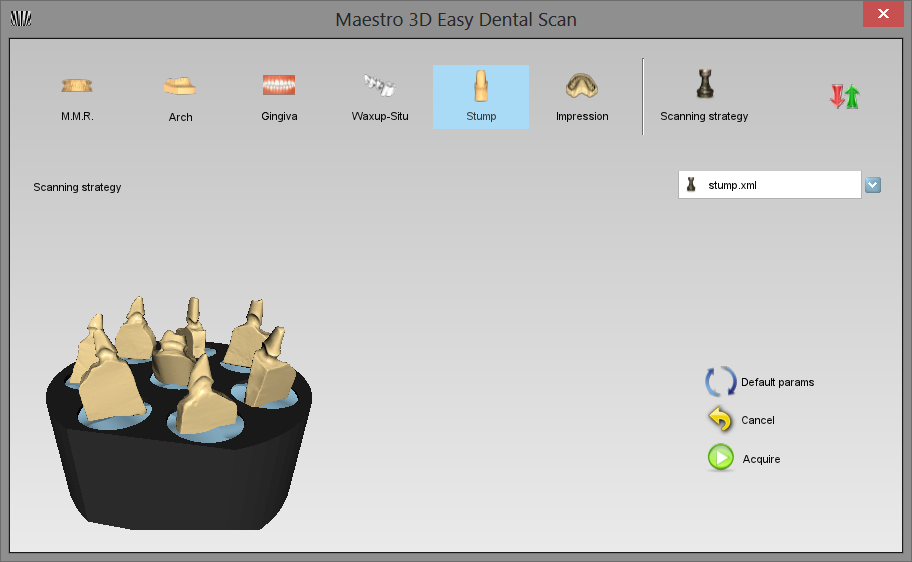
Mediante questa finestra si può decidere il tipo di modello da scansionare.
Cliccando su ![]() Opzioni Avanzate si apre la seguente finestra nella quale si possono andare a modificare i parametri di scansione.
Opzioni Avanzate si apre la seguente finestra nella quale si possono andare a modificare i parametri di scansione.
Nel caso si scelga di scansionare un'arcata, gengiva, waxup o impronta, sarà possibile selezionare se si tratta di elemento superiore o inferiore.
Opzioni Avanzate
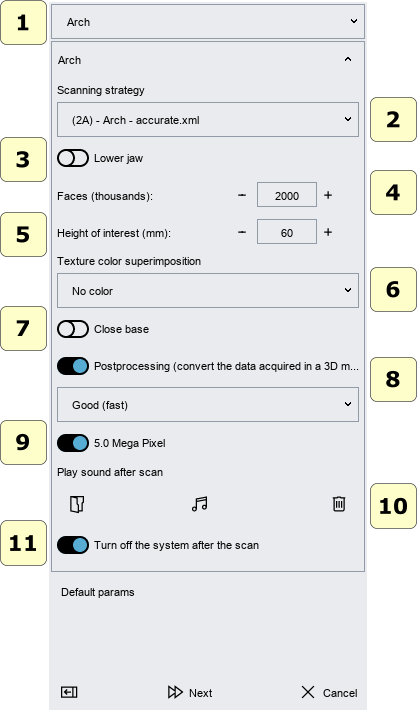
In questa parte della finestra si possono definire i parametri della scansione.
- Strategia di scansione:
È possibile definire quale strtegia di scansione utilizzare. Le strategie disponibili dipendono dal modulo basculante se è attivo o meno. Nel caso non sia attivo, verranno mostrate solo le strategie che non utilizzano l'asse basculante.
|
ATTENZIONE Può accadere che con un basso numero di acquisizioni (ad esempio 4-5) per alcuni particolari modelli non sia possibile riuscire ad ottenere la scansione perché non c'è sufficiente sovrapposizione tra le varie riprese. In questo caso è sufficiente aumentare il numero di acquisizioni nella strategia. |
- Triangoli:
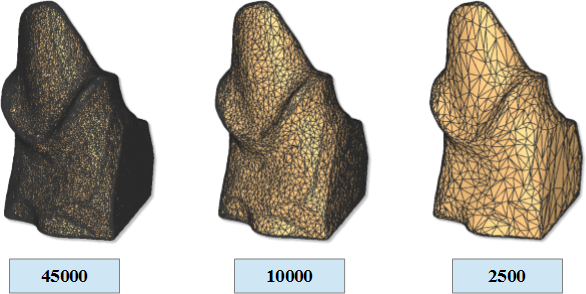
Questo numero definisce il numero di triangoli desiderati per il modello finale. La figura sottostante mostra lo stesso modello con 45000, 10000 e 2500 triangoli. La precisione e l'accuratezza dei 3 modelli e' equivalente. Il sistema acquisisce sempre alla massima precisione e massima accuratezza ottenendo un modello al massimo numero di triangoli. In seguito questo viene decimato per ottenere il numero di triangoli desiderati. E' anche possibile decimare il modello in un secondo momento tramite l'apposita' funzionalita' di decimazione.
|
ATTENZIONE Maggiore e' il numero di triangoli, maggiori saranno le dimensioni in byte del file STL.
|
Valori Raccomandati:
| Arcate\Gengiva\Waxup\Impronte | 180000 - 300000 triangoli |
| Monconi | 15000 - 60000 triangoli |
| MMR | 180000 - 300000 triangoli |
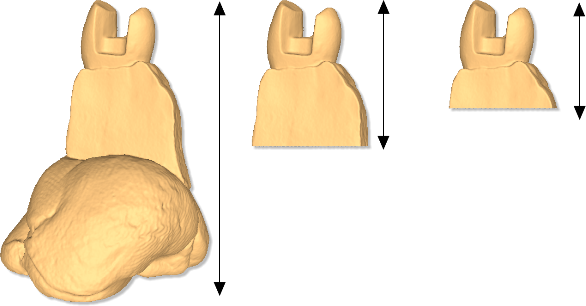
- Altezza di interesse:
Questo parametro consente di scegliere l'altezza di interesse del modello, (il valore di altezza è misurata partendo dall'alto verso il basso).
La prima foto (da sinistra a destra) mostra il modello di un moncone dove il parametro di altezza di interesse è fissata a MAX e quindi il moncone viene acquisito interamente compreso il sostegno della plastilina adesiva. Le immagini successive mostrano lo stesso moncone con l'altezza di interesse fissata rispettivamente a 20 mm e 15 mm (come si può notare il supporto della plastilina adesiva viene rimosso automaticamente).
È importante ricordare che, al fine di sfruttare al meglio questo parametro, il modello (arcata, monconi, ecc...) deve essere posizionati perpendicolarmente alla superficie della tavola rotante.
|
IMPORTANTE Tagliare il modello scegliendo l'altezza di interesse riduce il tempo di calcolo di postprocessing e può migliorare la qualità dei risultati ottenuti. (Un volume più piccolo della nuvola di punti dei monconi può portare ad una migliore qualità del modello finale). |
In ogni caso, è sempre possibile rimuovere la geometria di non interesse, in qualsiasi momento, editando il modello.
- Texture Color Superimposition:
Questa opzione richiede che il modulo di Texture Color Superimposition sia attivo. L'attivazione avviene tramite una licenza software. Questa funzione è utile per ottenere i modelli con una texture di colore RGB o una texture di colore in scala di grigi. Ad esempio, essa contribuisce a creare delle linee di margine molto precise come disegnate sul modello.
- Migliora l'allineamento:
Se questa opzione è selezionata, il software utilizzerà una procedura in grado di migliorare l'allineamento delle diverse acquisizioni. Questo non è consigliato se si utilizzano strategie con numerose acquisizioni, (più di 20). Questo perché il tempo e la memoria utilizzata potrebbe essere molto elevata.
- Chiudi base:
Se questa opzione è selezionata, il software chiude la base inferiore del modello automaticamente.
- Postprocessing (convertire i dati acquisiti in un modello 3D):
Se questa opzione è selezionata, il sistema di elaborazione automatica i dati acquisiti e costruisce la superficie geometria triangolare. Se l'opzione non è selezionata i dati scansionati non saranno elaborati. È possibile elaborazione i dati acquisiti successivamente.
- Good (fast): questa opzione è consigliata.
- Best (slow): questa opzione richiede più tempo di calcolo e costruisce un modelli 3D con maggiori dettagli.
|
CONSIGLIO Per ridurre il tempo di interazione con lo scanner, dove si hanno molti modelli da scansionare è consigliabile non fare la postprocessing dopo ogni scansione. In questo caso si consiglia di scansione tutti i modelli (non selezionare l'opzione "Postprocessing", non selezionare l'opzione "Spegnimento del sistema") e alla fine del lavoro, spegnere il sistema e selezionare dall'albero delle scansioni, tutti gli elementi (rangemaps) da postprocessare e premere il tasto di postprocessing per elaborare tutti i modelli. |
- Suona dopo la scansione:
È possibile scegliere un file audio *.wav che verrà eseguito al termine della scansione e al termine post-processing.
- Spegnere il sistema dopo la scansione:
Spegnere il sistema dopo la fine della scansione.
|
CONSIGLIO Ricordarsi di spegnere il sistema quando non è in uso per evitare di sprecare la lampada. |
Processo di scansione
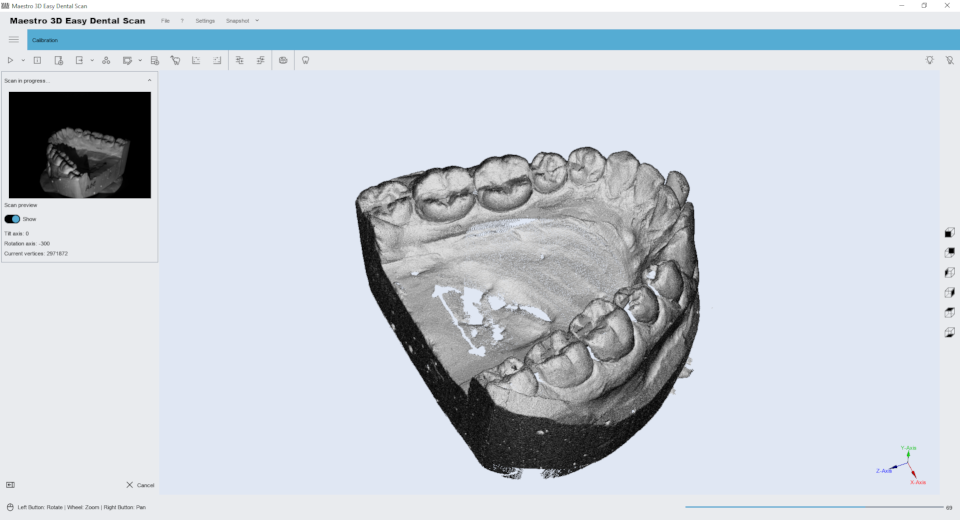
Questa finestra mostra lo stato di avanzamento della fase di scansione. Questa operazione potrebbe richiedere alcuni secondi o alcuni minuti a seconda della strategia scelta. Nella finestra a sinistra viene mostrata l'immagine ripresa 2D, mentre sulla destra viene mostrata l'immagine in 3D.
Dopo questa operazione, se l'opzione "Postprocessing" è stata selezionata il software genera automaticamente la superficie 3D del modello dai punti acquisiti e aggiunge all'albero delle scansioni un nuovo elemento. Successivamente, selezionandolo nell'albero delle scansioni, il modello viene visualizzato nell'area di visualizzazione.
Se l'opzione "Postprocessing" non è stata selezionata, il software aggiunge all'albero delle scansioni un nuovo elemento con un'icona in scala di grigi. Prima di poter eseguire qualsiasi operazione di questo modello sarà necessario effettuare il postprocessing dei dati acquisiti.
|
ATTENZIONE Prima di eseguire una scansione, assicurarsi che il modello sia posizionato correttamente sulla tavola rotante e che la porta anteriore dello scanner sia chiusa. Durante la scansione si prega di non muovere e non toccare né lo scanner né il suo piano di appoggio. |
Corretto posizionamento degli oggetti
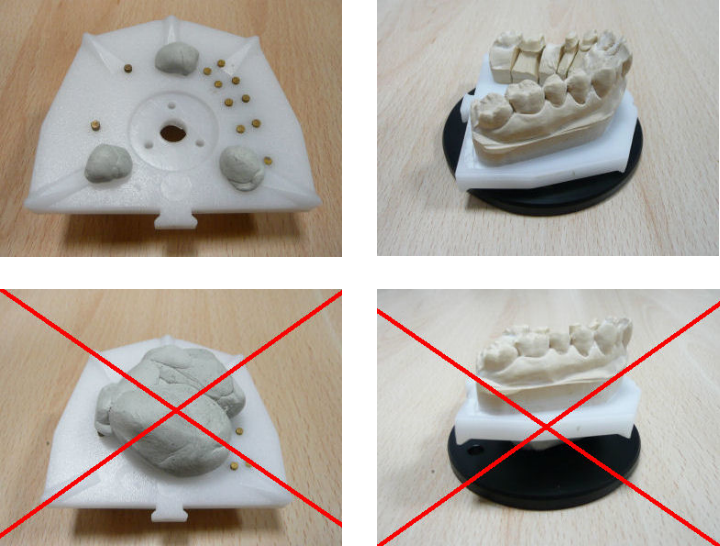
Nelle immagini seguenti viene mostrato il corretto posizionamento dei modelli sulla tavola rotante. L'immagine sotto mostra un'arcata correttamente posizionata sulla tavola rotante. L'arcata deve essere posizionata al centro della tavola rotante. Questa deve essere fissata attraverso l'apposita plastilina o qualsiasi altro adesivo che mantenga ben ancorato il modello.
L'arcata deve essere posizionata in maniera parallela alla superficie e non deve essere inclinata.
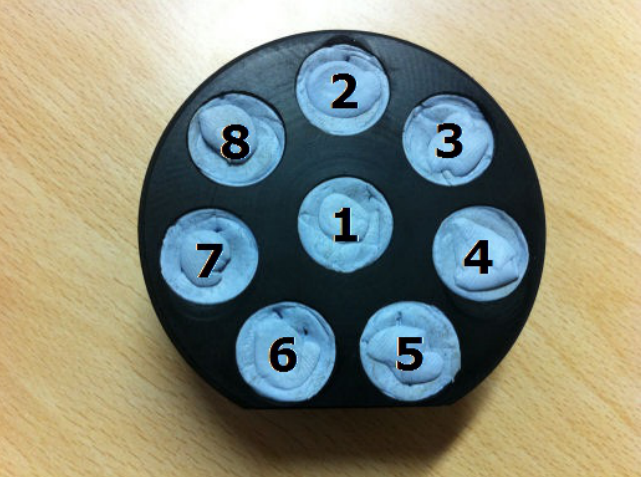
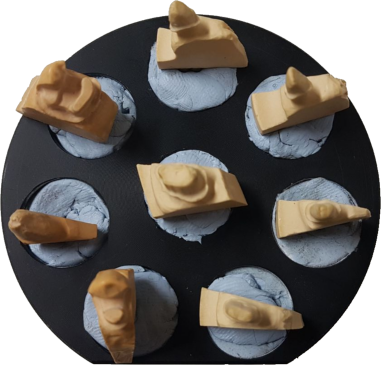
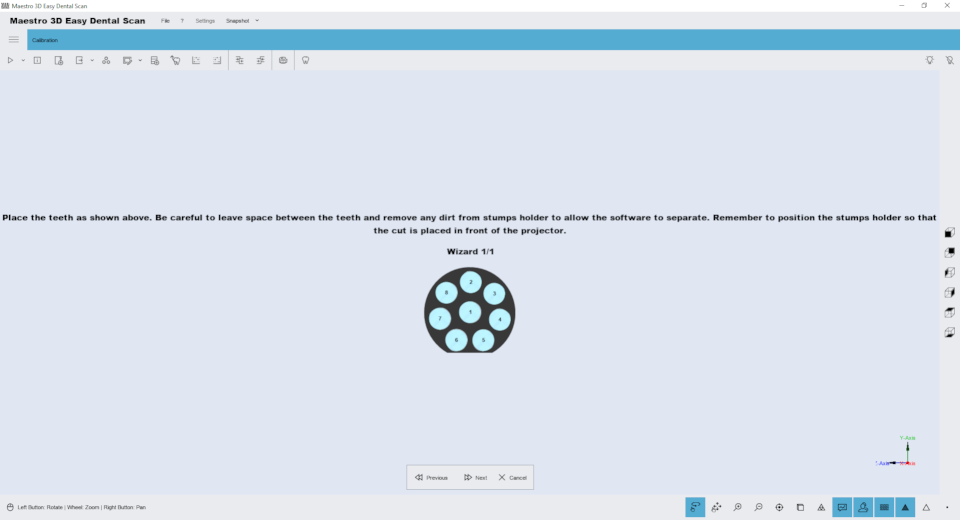
È possibile mettere sulla tavola rotante dello scanner più monconi contemporaneamente. Vedere le seguenti immagini per osservare il corretto posizionamento dei monconi. Dopo il processo di scansione, il software riconosce automaticamente e separa i singoli monconi. Aggiunge quindi ogni singolo element per moncone nell'albero delle scansioni. Le immagini sotto mostrano come posizionare correttamente i monconi sulla tavola rotante dello scanner. Lo scanner è dotato di un piatto multi monconi dove è possibile posizionare fino a 8 monconi.
La numerazione (1..8) sulla piastra rispetta la numerazione degli elementi aggiunti all'albero delle scansioni solo se il piatto multi monconi è posizionato correttamente e in fronte allo scanner. Quando si lavora con più di un moncone è assolutamente necessario che la plastilina adesiva di supporto e il corpo di ogni moncone risultino separati almeno di alcuni millimetri l'uno dall'altro. In questo modo il software di scansione è in grado di identificare ogni moncone. Vedere il posizionamento corretto dei monconi nella foto qui sotto:
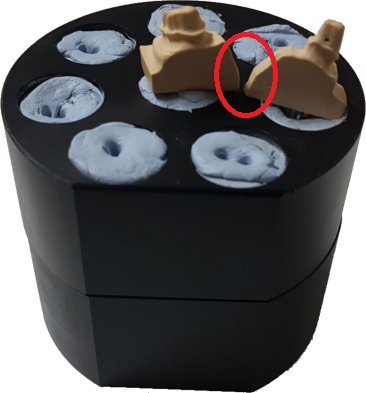
Un esempio di errato posizionamento:
|
ATTENZIONE Come mostrato nella foto sopra, il supporto della plastilina di ogni moncone e i monconi stessi non si deve toccare o non devono essere troppo vicini. Il posizionamento errato dei monconi impedisce al software di scansione la corretta identificazione e separazione dei singoli monconi. |
|
CONSIGLIO Il moncone\i non deve essere posizionato con un'inclinazione eccessiva, perché lo scanner non è in grado, in tali condizioni, di acquisire corretttamente tutta la linea di margine. I monconi quindi, devono essere sempre posizionati perpendicolarmente alla superficie della tavola rotante. |
Scanning Strategy
The following image shows the window for managing the scanning strategies.
- 1) Scanning group: MMR, Arch, Stumps, Impression.
- 2) Strategy name.
- 3)
- New Strategy.
- Save current Strategy.
- Delete current Strategy.
- 4) Add tilt command (before adding the command selects the rotation degrees).
- 5) Add rotation command (before adding the command selects the rotation degrees).
- 6) Commands:
- Clear all commands.
- Delete selected command.
- Add tilt home position command.
- Add rotation home position command.
- Add an alignment group.
- Add a single acquisition.
- Start the strategy simulation.
- 7) add a batch acquisition. (before adding the command select the number of rotary table steps of the rotary Axis).
|
TIPS:
|
Stumps registration
The registration of stumps is totally automatic and it allows to replace the low resolution stumps, acquired with the arch, by the high resolution stumps acquired without the arch.
Select into the Tree Area the arch with the stumps (which are to be replaced) and click the button ![]()
After the arch is displayed in the Visualization Area with a constrained view so that it can be inspected only from above.
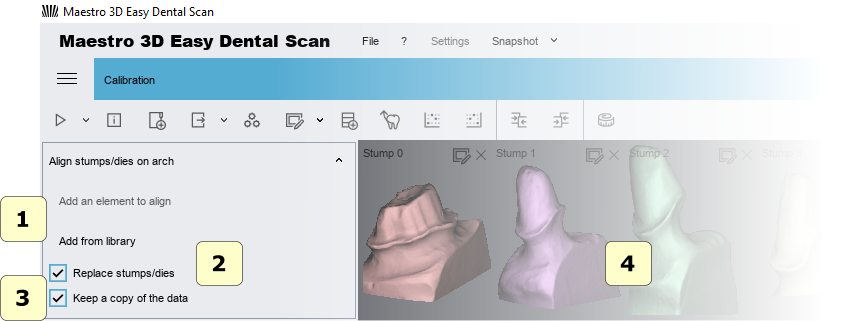
- 1) To add the stumps\scan body to substitute, select these from tree area and press the buttons.
- 2) Options:
- if replace stumps is checked, the high resolutions of the single stump will be replaced with the lower resolutions stump scanned with the arch. This is recommended if you need to work with a dental cad software. If not select this option the stump will be only aligned.
- If this option is checked the software make a backup copy of the data.
- 3) Choose the kind of registration procedure (1 point registration or 2D selection registration).
- 4) Preview area of the stumps.
|
TIP: If the selected stump is not the correct stump, just close the preview window to remove it from the registration process. You can register up to 16 stumps simultaneously. |
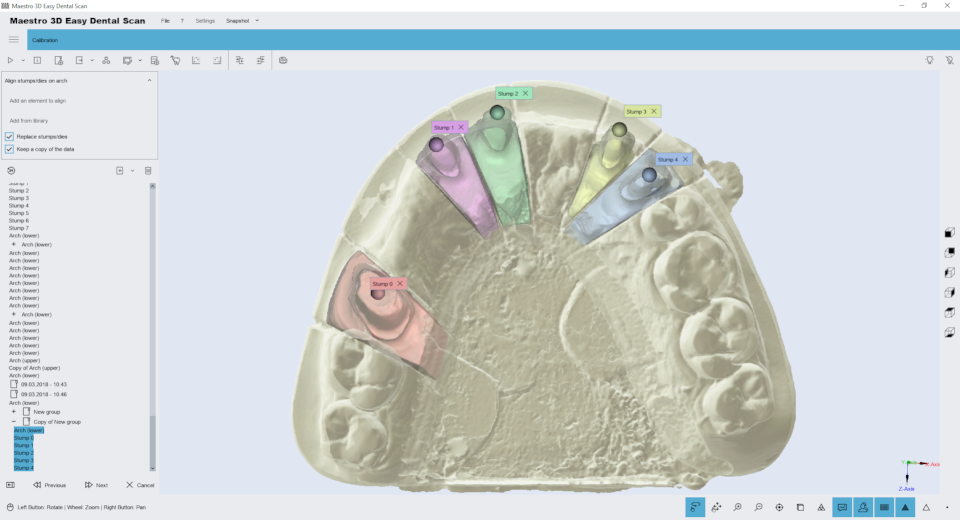
After having selected and added the stumps, press the SHIFT key and left mouse button double click with the left mouse button over the center of the head of the low resolution stumps to indicate the position where every stump must be registered.
By double clicking over the head of the stumps, it is added to the Visualization Area a sphere (called marker) associated with a number. Color and number, as shown in the picture, these are associated with the right stump.
|
TIP: To remove a marker double-click on it. |
Before to proceed with the registration, please make sure that each marker is associated with the right stump.
To proced with the registration press the button ![]() .
.
A progress bar placed in the Bottom Toolbar will indicate the progress of the registration process.
At the end of the registration process the result of the registration is displayed in the Visualization Area, where low resolution stumps have been replaced with high resolution stumps.
If you are satisfied with the result press the button ![]() to finish and save the registration obtained or press the previous button to return to previous step.
to finish and save the registration obtained or press the previous button to return to previous step.
If one or more stumps are not correct aligned, press the close button near the marker and then after having completed this task you can re-register only those stumps.
If the registration is not satisfactory, please verify that markers have been placed in the correct position as explained previously (in the center of the head of each stump and in the correct order).
|
TIP: It is also possible substitute the stumps on the arch with a manual alignment. |
Manual 3-2-1 alignment
With the manual registration process, is possible to align any pair of models. To align two models. For example useful to align a stump on an arch or an arch or bite with a antagonists reference model.
To align the two models need to select the fixed model ![]() (example maxillary mandibular relationship) and the floating model
(example maxillary mandibular relationship) and the floating model ![]() (example arch).
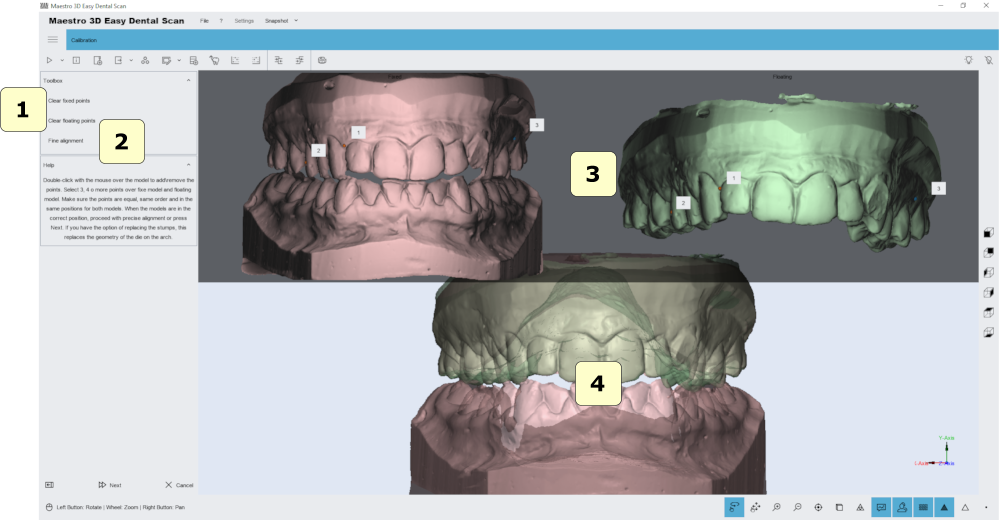
The next image shows the manual alignment window.
(example arch).
The next image shows the manual alignment window.
To align the floating object over the fixed object you have to add some points in the fixed model that appears to the left of the screen and the same points should be added to the floating object in the right of the window. You must add at least 3 points on each model.
- 1) Clear fixed or floating point.
- 2) Fine alignment. Improves the initial alignment given by the points entered by the user.
- 3) In case you are align a stump over an arch you can check this option to replace the geometry of the high resolution stump on the lower resolution stump of the arch.
- 4) Preview area where are showed the fixed and floating model.
- 5) Alignment result.
|
TIP: Press the SHIFT key and left mouse button double click to add a point over the model. |
Editing Filters
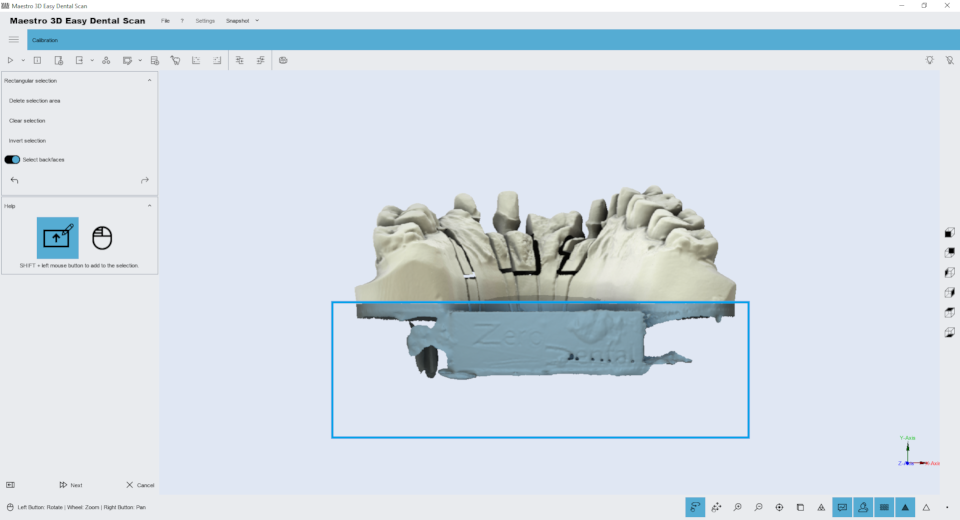
Editing with 2D rectangle
With this button ![]() you can access the editing features of the rectangular selection.
The image below shows the filter window.
you can access the editing features of the rectangular selection.
The image below shows the filter window.
Holding down the SHIFT key and the left mouse button you can draw a rectangular selection area. The area of the selected geometry will appear colored red. In the toolbox on the left side of the screen there are buttons to delete the selected area, invert the selection, clear the selection.
To save the changes and return to the previous screen, press the button ![]() .
.
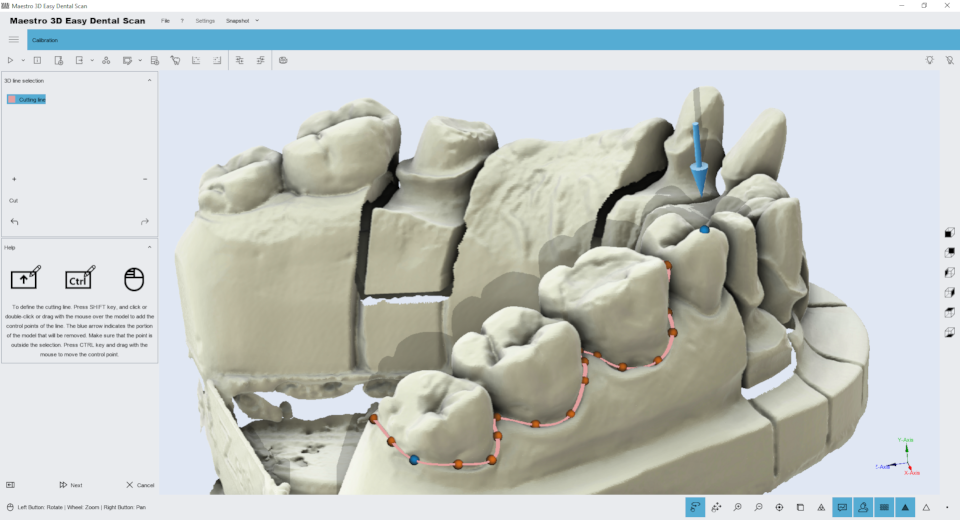
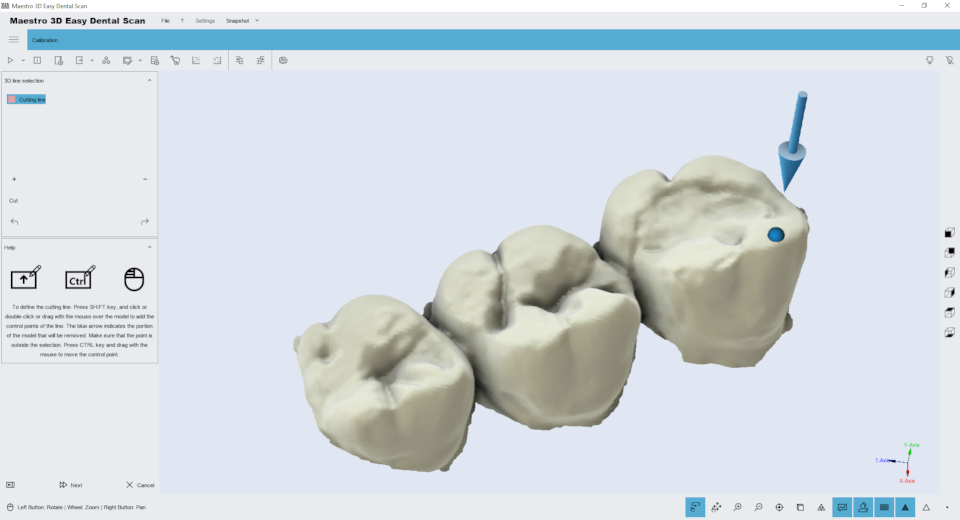
Editing with 3D polyline
With this button ![]() you can access the editing features of the 3D polyline selection.
The image below shows the filter window.
you can access the editing features of the 3D polyline selection.
The image below shows the filter window.
Holding down the SHIFT key and the left mouse button you can draw a 3D polyline over the model. This function is useful to remove the gum or the waxup from a model. After you have drawn the polyline just double click into the area that you want to delete. The image below shows the result of the filter.
To save the changes and return to the previous screen, press the button ![]() .
.
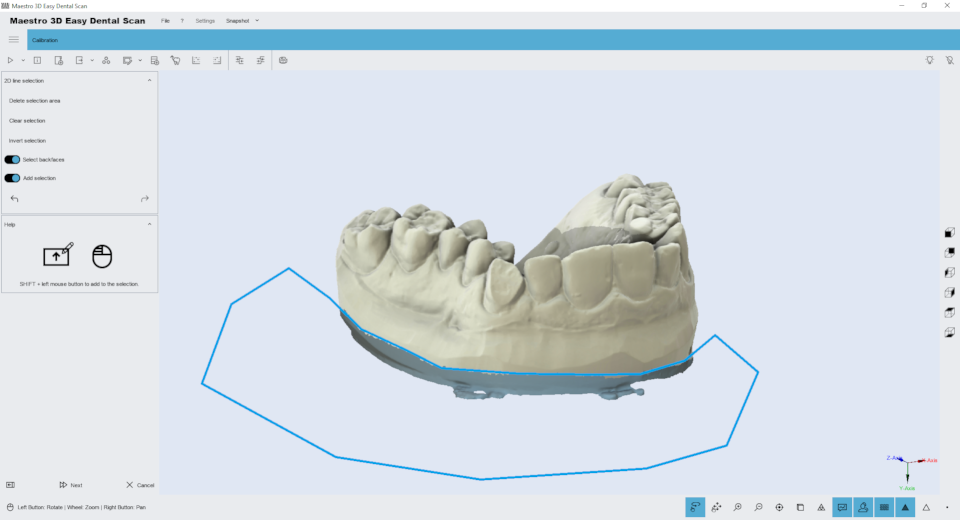
Editing with 2D selection
With this button ![]() you can access the editing features of the 2D selection.
The image below shows the filter window.
you can access the editing features of the 2D selection.
The image below shows the filter window.
Holding down the SHIFT key and the left mouse button you can draw a 2D selection area. The area of the selected geometry will appear colored blu. In the top of the screen there are buttons to delete the selected area, invert the selection, clear the selection.
To save the changes and return to the previous screen, press the button ![]() .
.
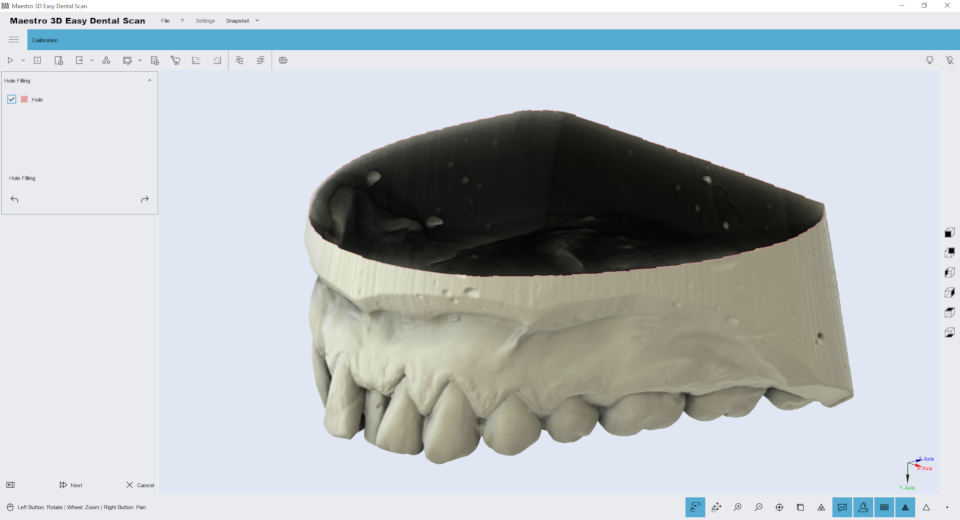
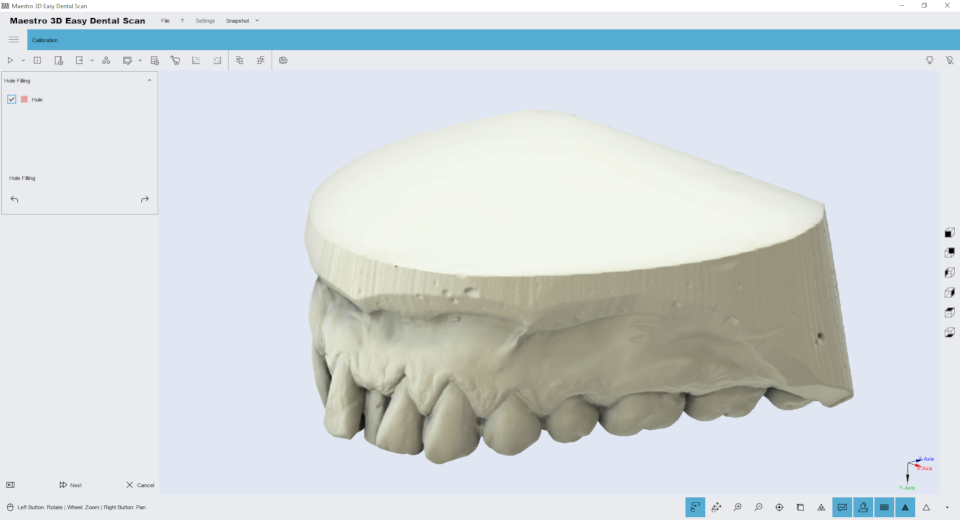
Holefilling
With this button ![]() you can access the editing feature of holefilling.
The image below shows the filter window.
you can access the editing feature of holefilling.
The image below shows the filter window.
Just press the button ![]() in the toolbox on the left side of the screen to filling all hole in the model. This is useful to fill the bottom of the base of a model. The image below shows the result of the filter.
in the toolbox on the left side of the screen to filling all hole in the model. This is useful to fill the bottom of the base of a model. The image below shows the result of the filter.
To save the changes and return to the previous screen, press the button ![]() .
.
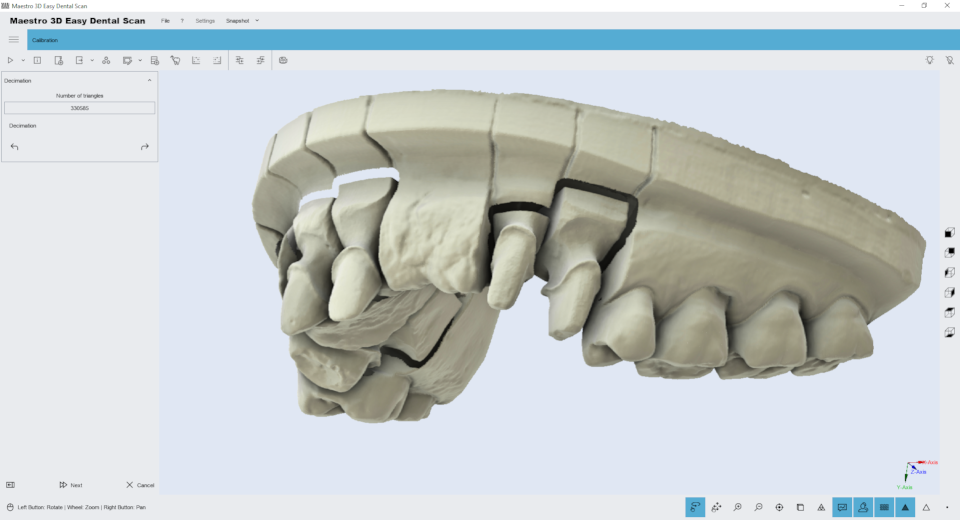
Decimation
With this button ![]() you can access the editing feature of decimation. With this feature it is possible to reduce the number of triangles of the model. The filter removes more triangles in the model areas with less features keeping better details in the most important areas of the model as the margin line or teeth geometry. The image below shows the filter window.
you can access the editing feature of decimation. With this feature it is possible to reduce the number of triangles of the model. The filter removes more triangles in the model areas with less features keeping better details in the most important areas of the model as the margin line or teeth geometry. The image below shows the filter window.
Just choose the triangles number and press the button ![]() in the toolbox on the left side of the screen to reduce the number of triangle of the model. To save the changes and return to the previous screen, press the button
in the toolbox on the left side of the screen to reduce the number of triangle of the model. To save the changes and return to the previous screen, press the button ![]() .
.
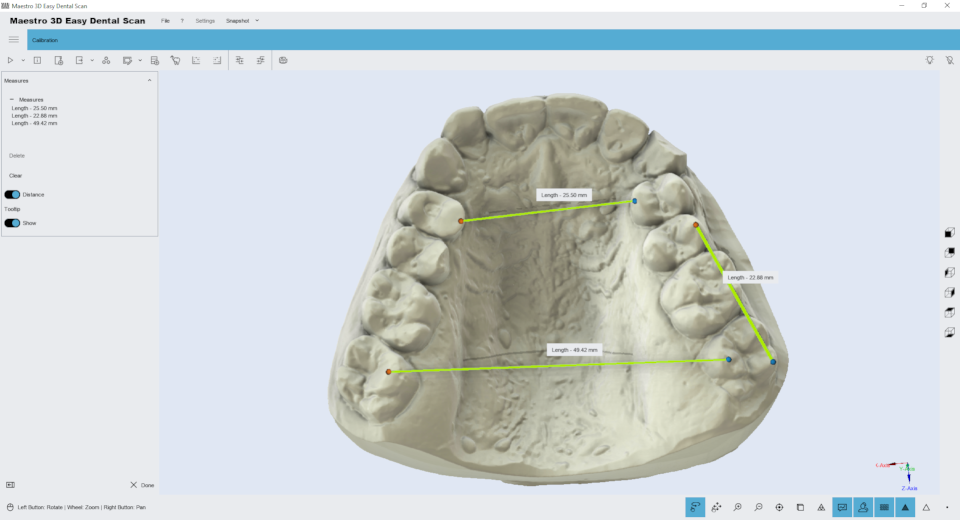
Free Measures
In order to perform the measures of length or angles, select the item to inspect and then press the ![]() measures button.
measures button.
|
TIPS: double-click with left mouse button to add a point. |
Stato dello Scanner
Through this function, you can monitor the status of the scanner hardware. The window will show the status of each hardware device inside the scanner.
Ortho Studio Wizard
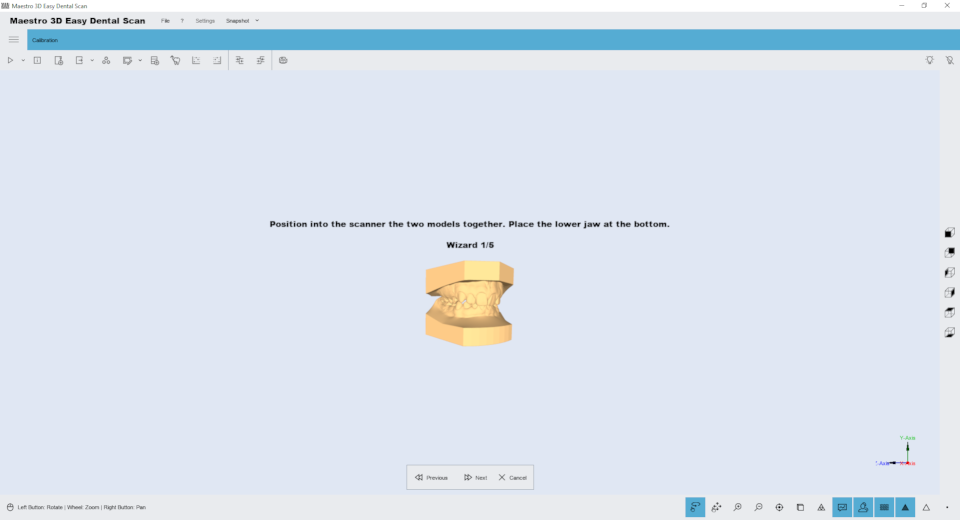
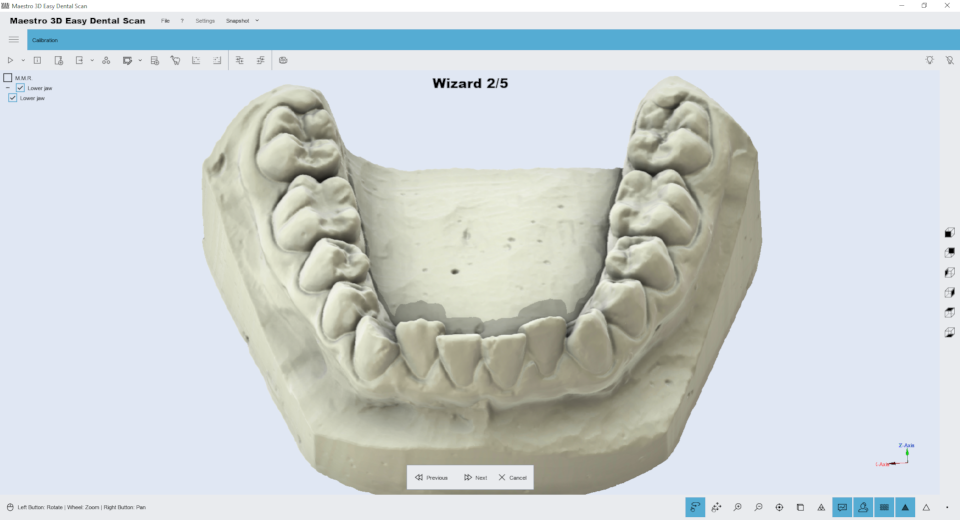
This scanning wizard helps the user to make all necessary scans and alignments to obtain a complete case to work into Ortho Studio software.
The following image shows the first step of the scan. In this phase you can scan maxillary and mandibular relationship. In this window you can change the scanning settings and the scanning strategy.
The following image shows the result of the previous scan, the maxillary and mandibular relationship. Now the user can scan the lower arch.
The following image shows the result of the previous scan, the lower arch. Now the user can scan the upper arch.
Now it's possible to perform the alignment of the upper and lower arch respect to the relationship.
The procedure of alignment is the Manual 3 2 1 Alignment.
After that the scanning software send the correct data to the Ortho Studio software.
Dental CAD Wizard
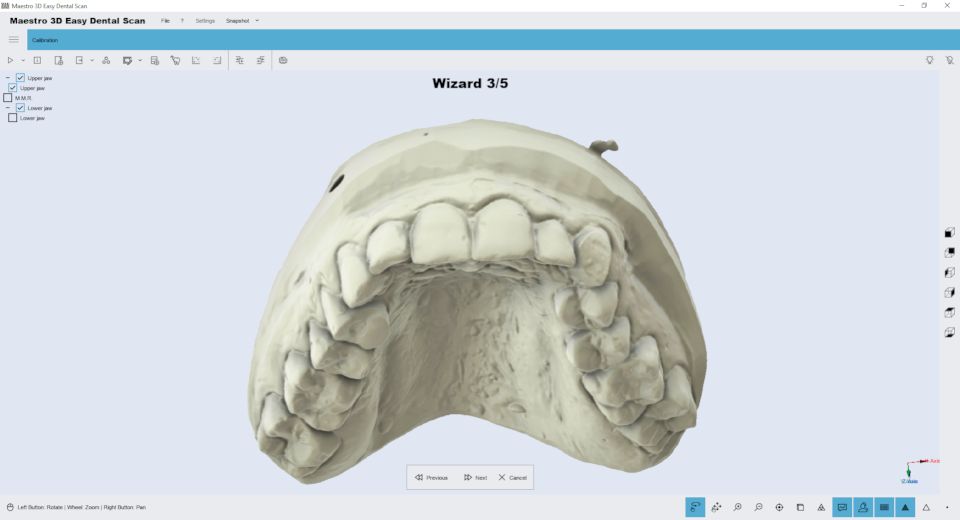
This scanning wizard helps the user to make all necessary scans and alignments to obtain a complete case to work into all dental cad integrated with Maestro 3D Scanner. The following image shows an example of a wizard step of the scan. In this window you can change the scanning settings and the scanning strategy.
Exocad Wizard
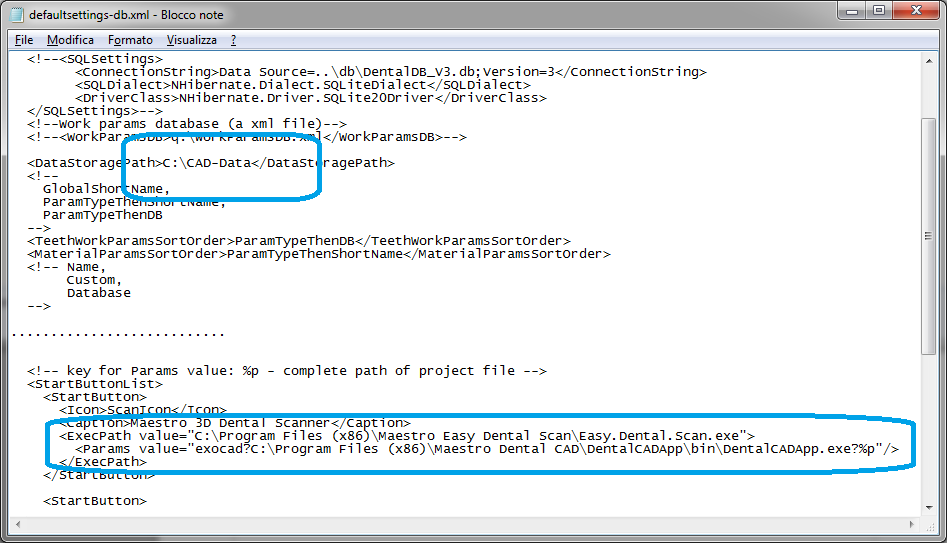
To integrate the scanner with the exocad software you need to edit the file \exocad-folder-installation\DentalDB\config\defaultsettings-db.xml as shown in the figure below.
<DataStoragePath>C:\CAD-Data</DataStoragePath>
...
<StartButtons>
<Button>
<Icon>ScanIcon</Icon>
< caption > Maestro 3D Dental Scanner < /caption >
<ExecPath value="C:\Program Files\Maestro Easy Dental Scan\Easy.Dental.Scan.exe">
<Params value="exocad?C:\Program Files\exoCAD\DentalCADApp\bin\DentalCADApp.exe?%p"/>
</ExecPath>
</Button>
...
- <ExecPath value = is the path where you have installed the Easy Dental Scan.
- <Params value = is the string exocad? and the path where you have installed dentalCADApp with ?%p at the end of the string.
FAQ
How can I see the Software version and the dongle serial?
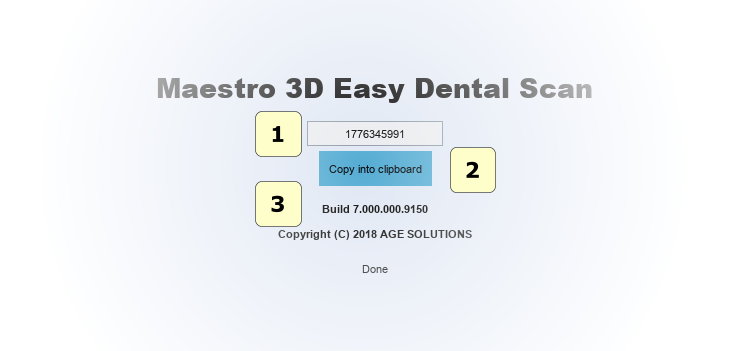
From the menu of the main window, tap on the enter ? -> About.... The image below shows the About window of the Software. In this window there is the dongle serial (tap on the adjacent key to copy it in the clipboard) and the version number Build
- 1) Dongle Serial.
- 2) Copy Dongle Serial into Clipboard.
- 3) Software Build Release version.
How can I see if my Software version is updated to the last available?
From the main menu tap on the entry File -> Check for updates.
How can I know which modules are active?
From the main menu tap on the entry File and tap on the entry Activate for each available module. Here, a message that will show if the module is active will appear; otherwise a window to import the license file that will activate the module in case it is not, will open.
How can I make a backup of all the scans?
Just make a copy of the folder where the software saves all scans. By default the folder is c:\MaestroData\.
The software is very slow on startup, what can I do?
If the software is very slow on startup, the cause is probably that the save folder (by default c:\MaestroData\) contains many scans. Just empty the folder or delete it completely and restart the software.
How can I change the save folder?
Edit the file application.settings.xml which is located in the installation folder of the software and change the string MaestroFolderData="c://MaestroData". To restore the settings with default value, just delete the file application.settings.xml and restart the software.
Metal parts can be scanned?
Yes it's possible but in order to improve scanning of metal parts you must use a scanning spray. In the market there are a lot spray but we advise the [Vacalon quickcheck spray].
