Maestro 3D Dental Scanner - Informazioni e Consigli
Introduzione all'uso dello scanner dentale Maestro 3D
Questo documento introduce l'utente in maniera semplice all'installazione e all'utilizzo dello scanner Maestro 3D. Si prega di leggere attentamente questo manuale prima di utilizzare lo scanner e il software di scansione.
Informazioni importanti
Precauzioni
Si prega di leggere attentamente queste pagine prima di usare lo scanner Maestro 3D. Il seriale dello scanner è posizionato nel retro della macchina.
Potrebbe essere necessario specificare il seriale per comunicazioni relative alla garanzia o alla assistenza.
WARNING: TO PREVENT FIRE OR SHOCK, DO NOT EXPOSE THIS UNIT TO RAIN OR MOISTURE. DO NOT USE THIS UNIT’S PLUG WITH AN EXTENSION CORD OR IN AN OUTLET UNLESS ALL THE PRONGS CAN BE FULLY INSERTED.
|
Disposing of your used product
Important safeguards
Installation
Do not place the Scanner in the following conditions:
- on an unstable cart, stand, or table.
- near water, baths or damp rooms.
- in direct sunlight, near heaters or heat radiating appliances.
- in a dusty, smoky or steamy environment.
- on a sheet of paper or cloth, rugs or carpets.
Maestro 3D Dental Scanner contains a projection unit. The Scanner should not be installed in any way other than the desktop, otherwise lamp life of its projection unit could decrease dramatically and the Scanner could work not properly or return incomplete or incorrect results.
Fire and shock precautions
- Ensure that there is sufficient ventilation and that vents are unobstructed to prevent the build-up of heat inside your Scanner. Allow at least 4 inches (10cm) of space between your Scanner and a wall.
- Do not try to touch the ventilation outlet placed on the back of the Scanner as it can become heated while the Scanner is turned on.
- Prevent foreign objects such as paper clips and bits of paper from falling into your Scanner. Do not attempt to retrieve any objects that might fall into your Scanner. Do not insert any metal objects such as a wire or screwdriver into your Scanner. If something should fall into your Scanner, disconnect it immediately and have the object removed by a qualified service personnel.
- Do not place any objects on top of the Scanner.
- Do not touch the power plug during a thunderstorm. Doing so can cause electrical shock or fire.
- The Scanner is designed to operate on a power supply of 120-240V AC 50/60 Hz. Ensure that your power supply fits this requirement before attempting to use your Scanner.
- Do not look into the projection unit lens while the Scanner is on. Serious damage to your eyes could result.
- Keep any items such as magnifying glass out of the light path of the projection unit. The light being projected from the lens is extensive, therefore any kind of abnormal objects that can redirect light coming out of the lens, can cause unpredictable outcome such as fire or injury to the eyes.
- Do not cover the projection unit lens with cap or similar while the Scanner is on. Doing so can lead to melting of the cap and possibly burning your hands due to the heat emitted from the light output.
- Do not place any objects, which are easily affected by heat, in front of the projection unit lens or a projector exhaust vent. Doing so could lead to the object melting or getting your hands burned from the heat that is emitted from the light output and exhaust.
- Handle the power cable carefully. A damaged or frayed power cable can cause electric shock or fire.
- Do not use any power cables than the supplied one.
- Do not bend or tug the power cable excessively.
- Do not place the power cable under the Scanner, or any heavy object.
- Do not cover the power cable with other soft materials such as rugs.
- Do not heat the power cable.
- Do not handle the power plug with wet hands.
- Turn off the Scanner, unplug the power cable and have the object removed by a qualified AGE Solutions service personnel under the following conditions:
- When the power cable or plug is damaged or frayed.
- If liquid has been spilled into the Scanner, or if it has been exposed to rain or water.
- If the Scanner does not operate normally when you follow the instructions described in this user's manual.
- If the Scanner has been dropped or the cabinet has been damaged.
- If the Scanner exhibits a distinct change in performance, indicating a need for service.
- Disconnect the power cable and any other cables before carrying the Scanner.
- Turn off the Scanner and unplug the power cable before cleaning the cabinet.
Drivers installation
| Use Windows 7 - 64 bit.
Install the chipset drivers and usb drivers of the PC motherboard. Install all Windows update available. Install the last graphics card available from NVIDIA web site http://www.nvidia.com. Don't connect the usb cable from scanner and PC before installing the drivers. |
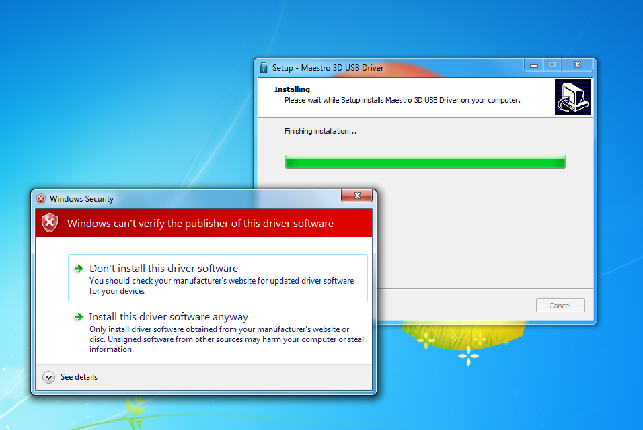
Run Maestro.3D.USB Driver.Setup.x32.x64.exe
Every time that windows show the alert window please click on: Install this driver software anyway.
This windows can appers 3, 4 or 5 times.
After that reboot the PC.
USB connection
After that you can turn on the power back buttons.
When you connect the first time the USB cable of the scanner to the PC the operating system could show some alert windows to search the driver of some scanner's components. In this case if this windows appears, click to search automatically the drivers into the PC.
This can happen every time that you change the usb port.
| WARNING: be sure to use USB 2.0, not use USB 3.0 port |
VGA connection
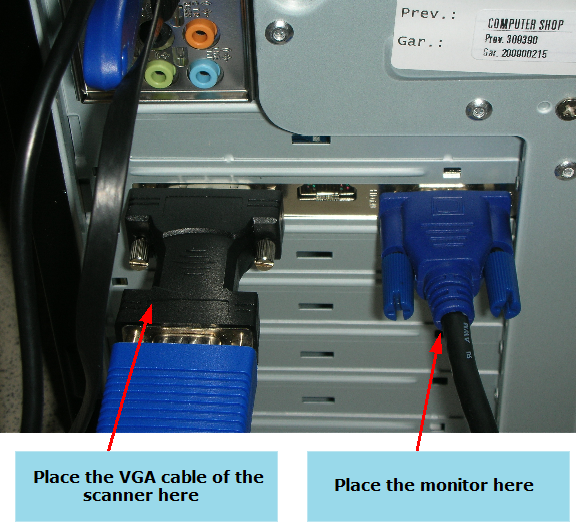
Connect the supplied VGA cable to the Scanner then connect the other plug of the supplied cable to the host PC auxiliar video out. Make sure that the cable is plugged entirely in the apposite connector, then fix the security screws placed on VGA cable (both on the Scanner and PC). A cable not correctly plugged can cause the malfunction of the Scanner and can lead to incorrect results.
Some recent video cards use a DVI output instead of VGA for secondary video output. In this case use the supplied adapter in conjunction with the VGA cable.
| CAUTION: Make sure that the VGA cable is fully inserted in secondary video output of Host PC because a cable not fully inserted can cause malfunction of the Scanner. Depending of video card of host PC, in some circumstances, this is a condition not detectable by Scanner diagnostics tools. |
In the following image you can see a screenshot of connectors of a Nvidia 8600 GT Video Card. In this case you must connect the Scanner to the DVI port using the supplied DVI to VGA connector.
| IMPORTANT: when you turn on your PC make sure the VGA cable is connected to the PC and the scanner, (also with the scanner turned off).
Otherwise can happen that when you turn on your PC the Graphic Card not having a VGA cable connected with the scanner it can disable the video output. In this case need to plug the VGA cable and restart the PC. |
Device manager
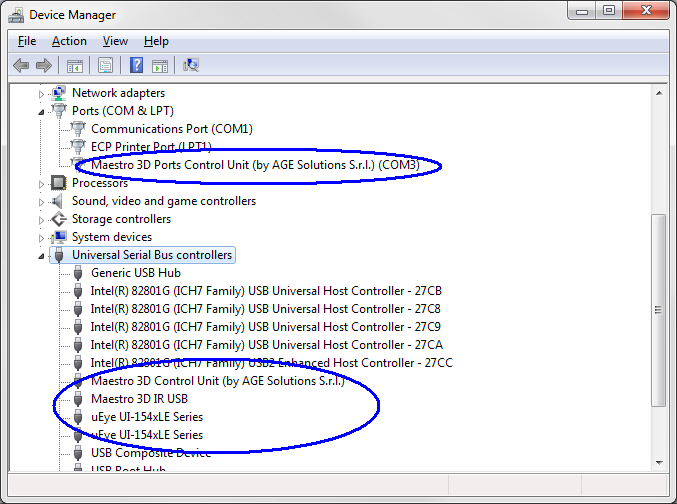
From the Device Manager you can see this:
The name of the drivers may be different.
If some hardware components are not correctly installed, try to right mouse click and try to update driver over Internet.
Install the scanning software. (See the manual of the scanning software).
After that: right mouse click over scanning software icon and Properties -> Advanced -> (check) Run As Administrator.
Install the calibration files
To Install the calibration files:
copy the two xml files:
camera.calibration.xml rotary.table.calibration.xml
into the folder of the scanning software.
| IMPORTANT: each calibration is different for each scanner. |
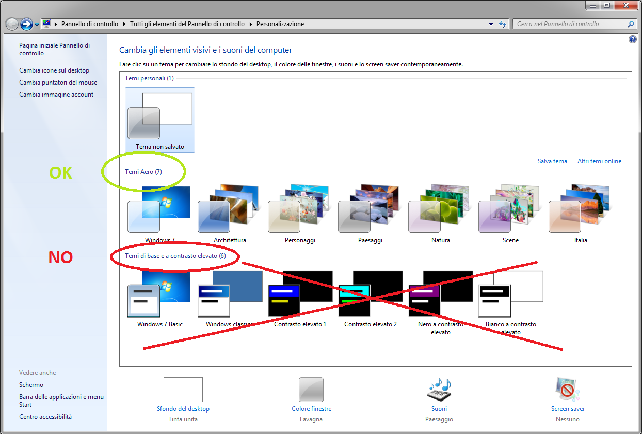
Windows Aero theme
Use the Windows Aero theme.
Screens configuration
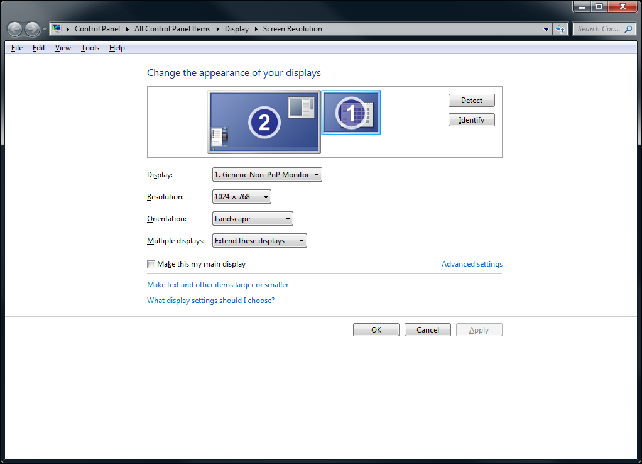
Set the projector (1) to the right of the main monitor with a resolution of 1024x768. The projector could be the screen with label 1 or label 2 depending of video card configuration.
Orientation: Landscape
Multiple displays: Extend these displays
Problems with antivirus or firewall
If the software freezed or the projection of the patterns is very slow, could be due to the presence of some antivirus or firewall installed on the PC. This softwares can scan and analyze the transit of information between a PC and scanner, slowing or stopping the operation of the scanner. To remove this problem and should be added "Maestro 3D Easy Dental Scan" to the list of exclusions of the antivirus or of the firwall, or unistall this software.
Problems with power options
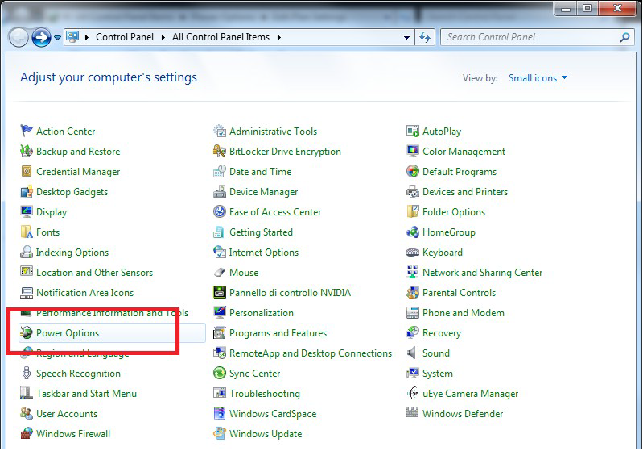
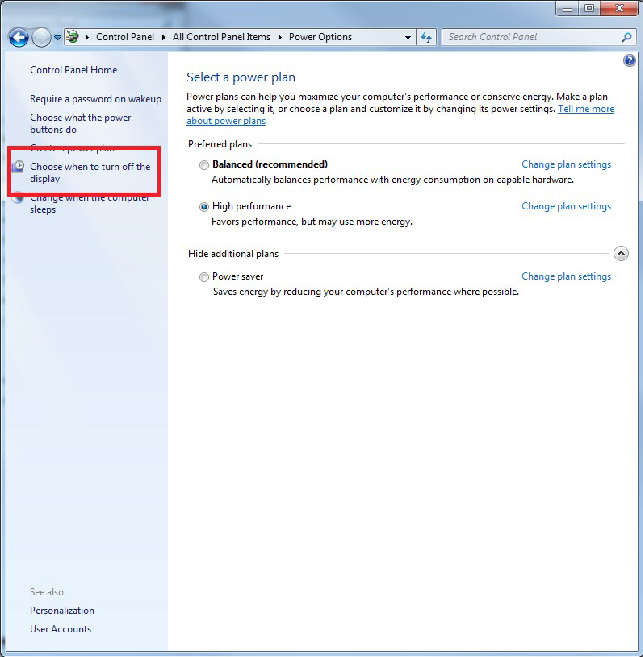
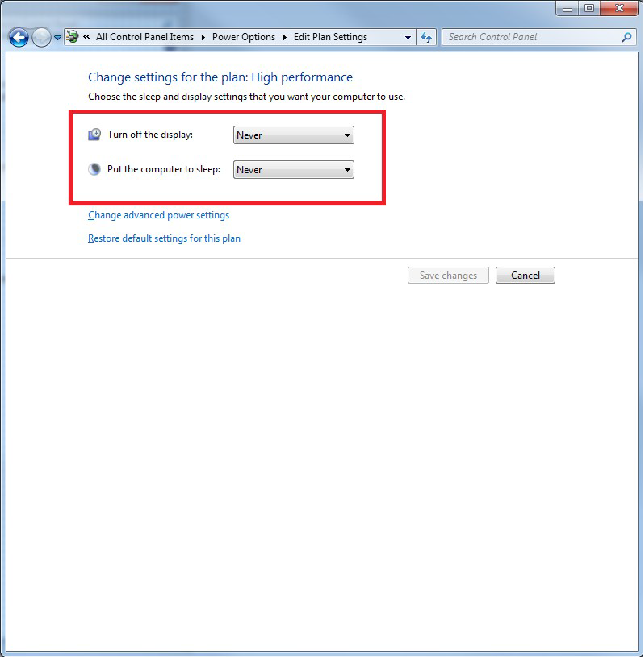
In order to ensure that scanner works properly please check for Power options in Control Panel. Ensure that monitor it's never disabled. Below it's an example of configuration done in Windows 7 64 bit.
Problems with projector
In order to ensure that scanner works properly please verify the projector status.
Sometimes could happens that the scanning software detects that the projector is turned on when in fact this is turned off or vice versa.
This can cause problems during the scanning phase. To check that status of the projector is consistent it's necessary press the info button ![]() and wait that the scanning software detect the hardware status. Into the info windows it's possible to check if the status of the projector it's turn on or turn off.
Now the user should really make sure that the projector is really turned on or really tuned off.
To do this, it is enough to verify if the projector emits a light, especially if it projects the desktop background. When the projector is turned on and all cables are correctly connected from scanner and PC the projector project the desktop background image. So if you put a white paper in front the projector you must see the background image of your desktop.
and wait that the scanning software detect the hardware status. Into the info windows it's possible to check if the status of the projector it's turn on or turn off.
Now the user should really make sure that the projector is really turned on or really tuned off.
To do this, it is enough to verify if the projector emits a light, especially if it projects the desktop background. When the projector is turned on and all cables are correctly connected from scanner and PC the projector project the desktop background image. So if you put a white paper in front the projector you must see the background image of your desktop.
CASE 1: if the software detect that the projector is turned on but in fact this is turned off this is the resolution:
Press the ![]() power on button and choose YES into the messagebox.
In this way both projector and software will be in a consistent state, because projector will
be phisically turned on and software still continue to detect the projector as turned on.
power on button and choose YES into the messagebox.
In this way both projector and software will be in a consistent state, because projector will
be phisically turned on and software still continue to detect the projector as turned on.
CASE 2: if the software detect that the projector is turned off but in fact this is turned on this is the resolution:
Press the ![]() power off button and choose YES into the messagebox.
In this way both projector and software will be in a consistent state, because projector will be phisically turned off and software still continue to detect the projector as turned off.
power off button and choose YES into the messagebox.
In this way both projector and software will be in a consistent state, because projector will be phisically turned off and software still continue to detect the projector as turned off.
This inconsistency happens when:
- the projector is turned on and the user turns off the scanner from back power
button.
- the usb drivers of the projector are not properly loaded (from Windows) after
connecting the usb cable. When this happens, just try to unplug the usb cable from PC, reboot the PC and plug it again in the same usb 2.0 port (not use usb 3.0) or into another. Usually after plugging the usb cable is better wait one minute before running the scanning software.
|
Warning: before to turns off the scanner from back power button, be sure to have turned off the projector from the scanning software. |
Scanner manutention
This chapter provides the needed informations for Maestro 3D Dental Scanner Manutention. Please read carefully this chapter before cleaning the Scanner or before perform any other manutention operation.
| CAUTION: Never touch the lenses or the other optical components, if not strictly necessary. Clean lenses only if after touching accidentally the lenses quality of Scanner results appears to be decreased. |
- Turn off the Scanner before cleaning.
- Clean the cabinet periodically with a damp cloth. If heavily soiled, use a mild detergent. Never use strong detergents or solvents such as alcohol or thinner.
- Use a blower or lens paper to clean the lenses, and be careful not to scratch or mar the lenses.
Troubleshooting
The following are the most common error messages you may encounter during the scanning.
VGA connection: fail
Check the following items:
- verify that the VGA cable is properly connected (on some PC it is not possible to detect if the cable is disconnected).
- verify that you use an Aero theme.
- verify the screen configuration.
- verify the power options.
- verify the projector status.
After that:
- close the scanning software
- restart the PC
- start again the scanning software
Bad rangemap: impossible to scan the object
Check the following items:
- verify that the VGA cable is properly connected (on some PC it is not possible to detect if the cable is disconnected)
- verify that you use an Aero theme
- verify the screen configuration
- verify the power options
- verify the projector status
- verify the material of the object. If the material being scanned is metal, dark or other reflective material it is necessary to treat the object with a special spray opacifier.
- Make sure that the scanner door is closed during every scan session.
Camera LX\RX not open
Check the following items:
- verify the USB connection
- verify the device manager
After that:
- close the scanning software
- turn off the PC
- unplug the usb cable
- change usb port
- turn on the PC
- start again the scanning software
Object has moved during scanning
Check the following items:
- lock the object to the plate with the putty.
- the number of acquisitions does not allow sufficient overlap between the shots, try to increase the number of acquisitions.
The projector shines a yellow light
If the proiector shines a yellow light during the scan phase or it shines a not white light, check the following items:
- It is possible that the VGA cable is partially disconnected from the PC or from the scanner.
- verify that the VGA cable is properly connected (on some PC it is not possible to detect if the cable is disconnected).
Shipping and Transport Considerations
Remember to remove all cables carefully, remove all objects and all support plates inside the scanner before transport.
When moving the Scanner please remember to take it carefully.
Transport the Scanner in supplied Maestro 3D Packaging.
Do not flip the Maestro 3D Packaging during transport.
Avoid strong shock or vibrations during transport.
Warranty
AGE SOLUTIONS (AGE) warrants that this scanner Maestro and all products of AGE are free from defects in workmanship and material for 12 months (24 for the end user) from the date of purchase. If any failure should occur under normal and proper usage within the period of the warranty then AGE will, through its service organizations, repair the product, at no charge.
This limited warranty does not cover:
- Products for which appropriate proof of purchase by the original customer cannot be provided.
- Damage caused by incorrect use, carelessness, unauthorized alterations, improper storage, unauthorized repairs or service or damage resulting from the operation of the product by incorrect supply or signal voltages. Cleaning of internal parts when used in a smoke affected atmosphere.
- Damage originating from equipment not delivered by AGE.
- Damage originating from any operations not made by AGE.
- Damage originating from incorrect handling or other negligence by Customer, i.e., non-compliance with the operating instructions.
- Damage originating from the use of the equipment for purposes other than designated for.
- Damage originating from other cause than the ordinary use of the equipment, such as transportation or calamity of nature (i.e., lightning, fire, floods).
- Failure of the projector, or any part of the projector, due to smoke, dirt, dust or use in a smoke affected atmosphere. In such cases the warranty will be void.
- Damage to external parts.
- Lamps. These are warrantied for 6 months.
Details can also be obtained from your reseller or from our website at: [www.age-solutions.com]
Should you encounter problems operating your scanner please first contact your reseller. If this product is defective your remedy is repair as set out above.
Transport costs and customs for the withdrawal of defective goods and the shipment of repaired goods are charged to the customer.
To the maximum extent permitted by applicable law, AGE will not be liable for any damages whatsoever (including, without limitation, incidental or consequential damages) arising out of the use, or the inability to use this product even if AGE or its reseller has been advised of the possibility of such damages. This warranty is in addition to, and does not affect, your statutory rights.


