Maestro 3D Dental Scanner - Informazioni e Consigli
Introduzione all'uso dello scanner dentale Maestro 3D
Questo documento introduce l'utente in maniera semplice all'installazione e all'utilizzo dello scanner Maestro 3D. Si prega di leggere attentamente questo manuale prima di utilizzare lo scanner e il software di scansione.
Informazioni importanti
Precauzioni
Si prega di leggere attentamente queste pagine prima di usare lo scanner Maestro 3D. Il seriale dello scanner è posizionato nel retro della macchina. Potrebbe essere necessario specificare il seriale per comunicazioni relative alla garanzia o alla assistenza.
ATTENZIONE: PER EVITARE INCENDI O SCOSSE ELETTRICHE, NON ESPORRE L'UNITA A PIOGGIA O UMIDITA'. |
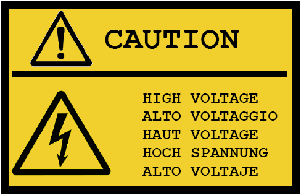
Queste raccomandazioni sono presentate in forma sintetica, le seguenti immagini si trovano sul retro dello scanner.
Smaltimento del prodotto usato
Importanti avvertenze
Installazione
Non mettere lo scanner in una delle seguenti condizioni:
- sopra di un tavolo, carrello o supporto instabile.
- In prossimità di acqua, bagni o locali umidi.
- Alla luce solare diretta, fonti di calore o apparecchi radianti.
- In un ambiente polveroso, fumoso o vaporoso.
- Su un foglio di carta o stoffa, tappeti o moquette.
Maestro 3D Dental Scanner contiene una unità di proiezione. Lo scanner non deve essere installato in modo non corretto, altrimenti la vita della lampada della sua unità di proiezione potrebbe diminuire drasticamente e lo scanner potrebbe non funzionare correttamente o restituire risultati incompleti o non corretti.
Prevenzione contro il fuoco e scosse elettriche
- Assicurarsi che la ventilazione sia sufficiente e che i fori non siano bloccati per prevenire l'accumulo di calore all'interno del vostro scanner. Lasciare almeno 4 pollici (10 cm) di spazio tra lo scanner e la parete.
- Non toccate la presa di ventilazione posta sul retro dello scanner come può surriscaldarsi, mentre lo scanner è acceso.
- Evitare che oggetti estranei, quali graffette e pezzi di carta di cadere nello scanner. Non tentare di recuperare eventuali oggetti che potrebbero cadere nello scanner. Non inserire oggetti metallici come un filo o un cacciavite nello scanner. Se qualcosa dovesse cadere nello scanner, scollegarlo immediatamente e fate rimuovere l'oggetto da un personale qualificato.
- Non collocare oggetti sulla parte superiore dello scanner.
- Non toccare la spina di alimentazione durante un temporale. Ciò potrebbe provocare scosse elettriche o incendi.
- Lo scanner è progettato per funzionare con alimentazione 120-240V AC 50/60 Hz. Assicurarsi che l'alimentazione sia conforme a questi requisiti prima di utilizzare lo scanner.
- Non guardare nell'obiettivo unità di proiezione, mentre lo scanner è acceso. Gravi danni ai vostri occhi potrebbe provocare.
- Tenete tutti gli elementi, come lente di ingrandimento fuori del percorso della luce l'unità di proiezione. La luce proiettata dall'obiettivo è estesa, quindi qualsiasi tipo di oggetto anomalo che può reindirizzare la luce proveniente dall'obiettivo, può causare un risultato imprevisto, quale un incendio o lesioni agli occhi.
- Non coprire la lente unità di proiezione con cappuccio o simili, mentre lo scanner è acceso. In questo modo può portare alla fusione del tappo e potete scottarvi le mani a causa del calore emesso dalla fonte di luce.
- Non posizionare alcun oggetto facilmente danneggiabile con il calore di fronte alla lente unità di proiezione o di un condotto di scarico proiettore. Ciò potrebbe portare alla fusione oggetto o mettere le mani bruciate dal calore che viene emesso dalla fonte di luce e gas di scarico.
- Maneggiare il cavo di alimentazione con cura. Un cavo di alimentazione danneggiato o consumato può causare scosse elettriche o incendi.
- Non usare cavi di alimentazione diversi da quello in dotazione.
- Non piegate o tirate eccessivamente il cavo.
- Non collocare il cavo di alimentazione sotto lo scanner, o altri oggetti pesanti.
- Non coprire il cavo di alimentazione con altri materiali morbidi come tappeti.
- Non riscaldare il cavo di alimentazione.
- Non maneggiare la spina con le mani bagnate.
- Spegnere lo scanner, scollegare il cavo di alimentazione e rimuovere l'oggetto da un personale qualificato AGE Soluzioni alle seguenti condizioni:
- Quando il cavo di alimentazione o la spina sono danneggiati o usurati.
- Se del liquido è stato versato nello scanner, o se è stato esposto a pioggia o acqua.
- Se lo scanner non funziona normalmente quando si seguono le istruzioni descritte in questo manuale.
- Se lo scanner è caduto o il telaio è stato danneggiato.
- Se lo scanner mostra un evidente cambiamento nelle prestazioni, indicante la necessità di assistenza.
- Scollegare il cavo di alimentazione e qualsiasi altro cavo prima di effettuare lo scanner.
- Spegnere lo scanner e scollegare il cavo di alimentazione prima di pulire il cabinet.
Installazione dei Drivers
| Utilizzare Windows 7 - 64 bit.
Installare tutti i driver del chipset e del bus usb della scheda madre del PC. Installare tutti gli update disponibili di Windows. Installare gli ultimi driver disponibili della scheda video dal sito NVIDIA http://www.nvidia.com. Non connettere lo scanner al PC prima di aver installato i driver. |
Eseguire Maestro.3D.USB Driver.Setup.x32.x64.exe
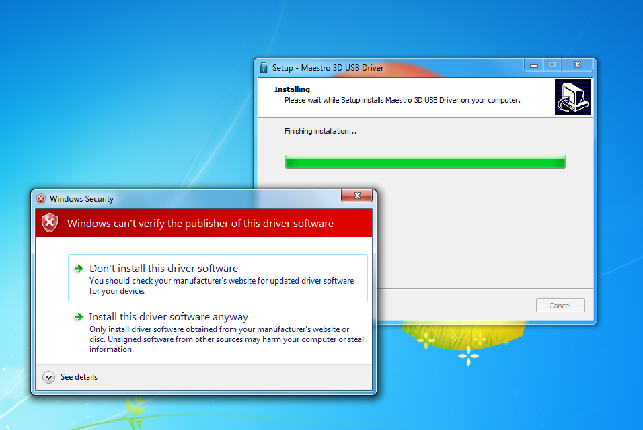
Ogni volta che verrà mostrata una finestra di avviso premere il pulsante: Installa i driver ugualmente.
Questo avviso può apparire 3, 4 o 5 volte.
Dopo questo riavviare il PC.
Connessione USB
Dopo il riavvio del PC sarà possibile connettere lo scanner al PC tramite il cavo USB in dotazione. Dopo la connessione del cavo è possibile accendere il pulsante posto sul retro dello scanner.
Quando si connette lo scanner al PC per la prima volta è possibile che il sistema operativo mostri alcune finestre di avviso per la ricerca dei driver delle componenti dello scanner. In questo caso se queste finestre vengono mostrare scegliere la voce che indica la ricerca automatica dei driver via Internet.
Questo può accadere ogni volta che si cambia porta USB.
| ATTENZIONE: utilizzare solo ed esclusivamente porte USB 2.0, non utilizzare porte USB 3.0 |
Connessione VGA
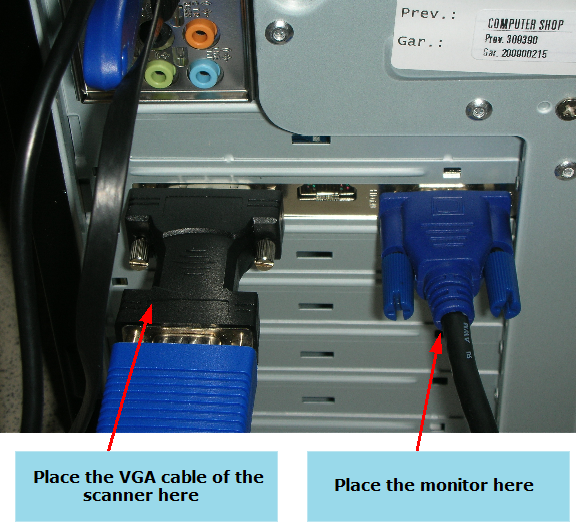
Collegare il cavo VGA in dotazione allo scanner quindi collegare l'altra spina del cavo in dotazione al PC. Utilizzare l'uscita ausiliaria della scheda video. Assicurarsi che il cavo sia inserito completamente nell'apposito conettore, quindi fissare le viti di sicurezza del connettore. Un cavo non collegato correttamente può causare il malfunzionamento dello scanner e può portare a risultati non corretti.
Alcune schede video recenti utilizzano come uscita secondaria una uscita DVI invece di quella VGA. In questo caso, utilizzare l'adattatore fornito in insieme al cavo VGA.
| ATTENZIONE: Assicurarsi che il cavo VGA sia completamente inserito nella uscita video secondaria del PC. Un cavo non inserito correttamente può causare malfunzionamenti dello scanner. A seconda della scheda video del PC ci possono essere alcune circostanze, in cui questa condizione non è rilevabile dagli strumenti di diagnostica dello scanner. |
Nella seguente immagine è mostrata una scheda video Nvidia 8600 GT. In questo caso lo scanner è connesso all'uscita DVI tramite l'apposioto connettore.
| IMPORTANTE: quando si accende il PC verificare che il cavo VGA sia collegato al PC e lo scanner, (anche con lo scanner spento).
Altrimenti può accadere che quando si accende il PC la scheda grafica non avendo un cavo VGA collegato con lo scanner possa disabilitare l'uscita video. In questo caso è necessario collegare il cavo VGA e riavviare il PC. |
Gestione Dispositivi
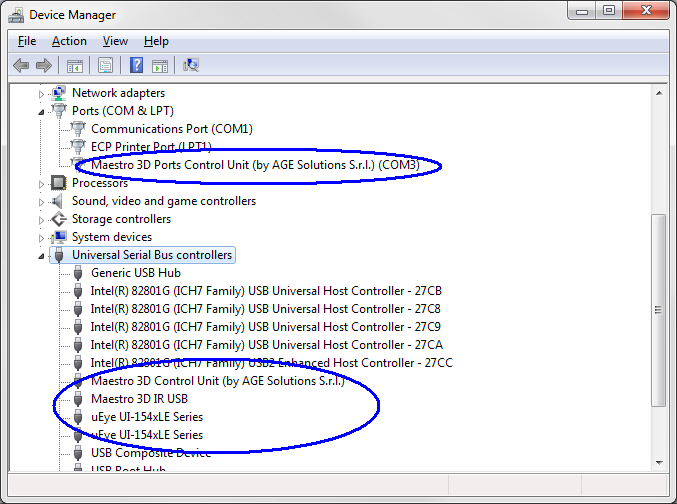
Dalla finestra di Gestione Dispositivi dovrebbero comparire i seguenti componenti cerchiati in azzurro:
I nomi delle periferiche potrebbero essere differenti.
Se alcuni componenti hardware non sono correttamente installi, fare tasto destro con il mouse e schegliere la voce aggiorna driver su Internet.
Installare il software di scansione. (Si consiglia di vedere le pagine relative al software di scansione).
Dopo l'installazione: tasto destro sull'icona del software e selezionare Proprietà -> Avanzate -> (spuntare) Esegui come amministratore.
Install the calibration files
To Install the calibration files:
copy the two xml files:
camera.calibration.xml rotary.table.calibration.xml
into the folder of the scanning software.
| IMPORTANT: each calibration is different for each scanner. |
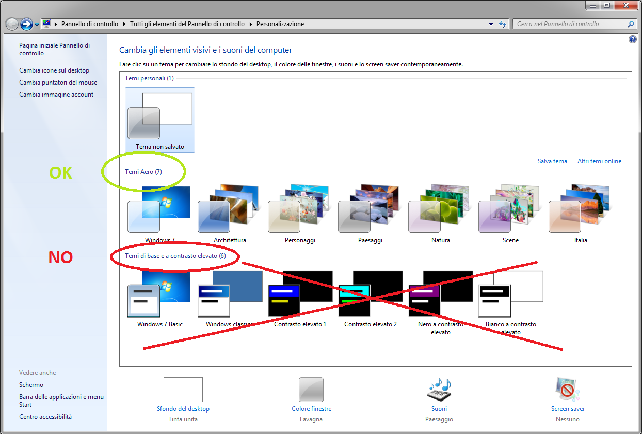
Windows Aero theme
Use the Windows Aero theme.
Screens configuration
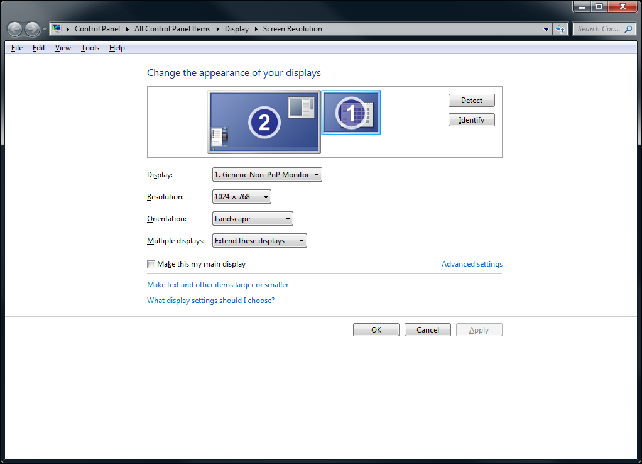
Set the projector (1) to the right of the main monitor with a resolution of 1024x768. The projector could be the screen with label 1 or label 2 depending of video card configuration.
Orientation: Landscape
Multiple displays: Extend these displays
Problems with antivirus or firewall
If the software freezed or the projection of the patterns is very slow, could be due to the presence of some antivirus or firewall installed on the PC. This softwares can scan and analyze the transit of information between a PC and scanner, slowing or stopping the operation of the scanner. To remove this problem and should be added "Maestro 3D Easy Dental Scan" to the list of exclusions of the antivirus or of the firwall, or unistall this software.
Problems with power options
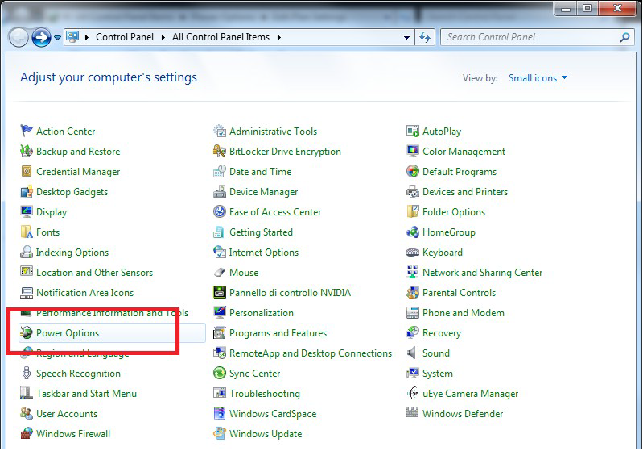
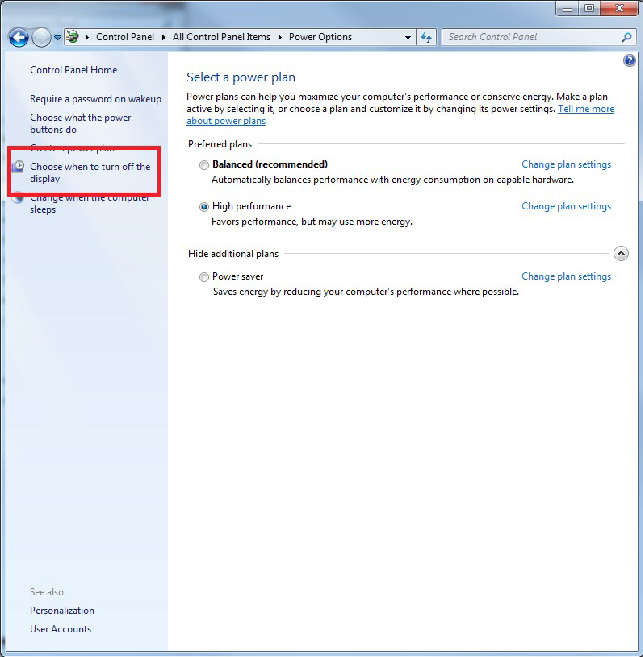
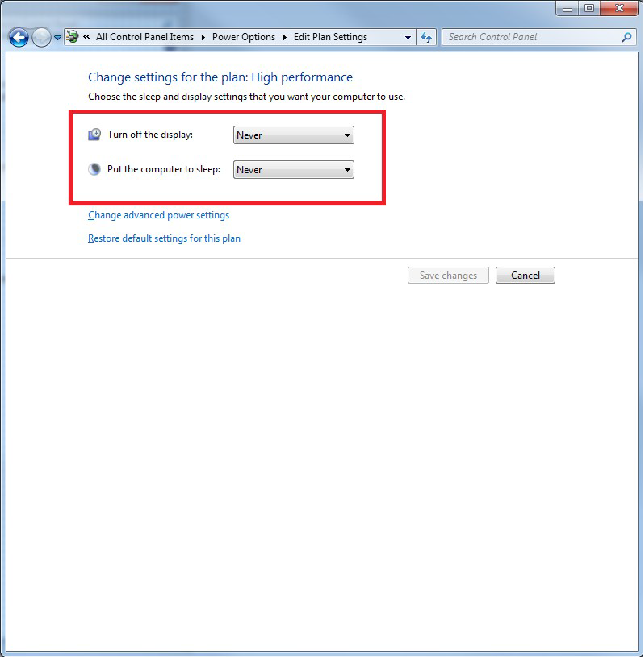
In order to ensure that scanner works properly please check for Power options in Control Panel. Ensure that monitor it's never disabled. Below it's an example of configuration done in Windows 7 64 bit.
Problems with projector
In order to ensure that scanner works properly please verify the projector status.
Sometimes could happens that the scanning software detects that the projector is turned on when in fact this is turned off or vice versa.
This can cause problems during the scanning phase. To check that status of the projector is consistent it's necessary press the info button ![]() and wait that the scanning software detect the hardware status. Into the info windows it's possible to check if the status of the projector it's turn on or turn off.
Now the user should really make sure that the projector is really turned on or really tuned off.
To do this, it is enough to verify if the projector emits a light, especially if it projects the desktop background. When the projector is turned on and all cables are correctly connected from scanner and PC the projector project the desktop background image. So if you put a white paper in front the projector you must see the background image of your desktop.
and wait that the scanning software detect the hardware status. Into the info windows it's possible to check if the status of the projector it's turn on or turn off.
Now the user should really make sure that the projector is really turned on or really tuned off.
To do this, it is enough to verify if the projector emits a light, especially if it projects the desktop background. When the projector is turned on and all cables are correctly connected from scanner and PC the projector project the desktop background image. So if you put a white paper in front the projector you must see the background image of your desktop.
CASE 1: if the software detect that the projector is turned on but in fact this is turned off this is the resolution:
Press the ![]() power on button and choose YES into the messagebox.
In this way both projector and software will be in a consistent state, because projector will
be phisically turned on and software still continue to detect the projector as turned on.
power on button and choose YES into the messagebox.
In this way both projector and software will be in a consistent state, because projector will
be phisically turned on and software still continue to detect the projector as turned on.
CASE 2: if the software detect that the projector is turned off but in fact this is turned on this is the resolution:
Press the ![]() power off button and choose YES into the messagebox.
In this way both projector and software will be in a consistent state, because projector will be phisically turned off and software still continue to detect the projector as turned off.
power off button and choose YES into the messagebox.
In this way both projector and software will be in a consistent state, because projector will be phisically turned off and software still continue to detect the projector as turned off.
This inconsistency happens when:
- the projector is turned on and the user turns off the scanner from back power
button.
- the usb drivers of the projector are not properly loaded (from Windows) after
connecting the usb cable. When this happens, just try to unplug the usb cable from PC, reboot the PC and plug it again in the same usb 2.0 port (not use usb 3.0) or into another. Usually after plugging the usb cable is better wait one minute before running the scanning software.
|
Warning: before to turns off the scanner from back power button, be sure to have turned off the projector from the scanning software. |
Scanner manutention
This chapter provides the needed informations for Maestro 3D Dental Scanner Manutention. Please read carefully this chapter before cleaning the Scanner or before perform any other manutention operation.
| CAUTION: Never touch the lenses or the other optical components, if not strictly necessary. Clean lenses only if after touching accidentally the lenses quality of Scanner results appears to be decreased. |
- Turn off the Scanner before cleaning.
- Clean the cabinet periodically with a damp cloth. If heavily soiled, use a mild detergent. Never use strong detergents or solvents such as alcohol or thinner.
- Use a blower or lens paper to clean the lenses, and be careful not to scratch or mar the lenses.
Troubleshooting
The following are the most common error messages you may encounter during the scanning.
VGA connection: fail
Check the following items:
- verify that the VGA cable is properly connected (on some PC it is not possible to detect if the cable is disconnected).
- verify that you use an Aero theme.
- verify the screen configuration.
- verify the power options.
- verify the projector status.
After that:
- close the scanning software
- restart the PC
- start again the scanning software
Bad rangemap: impossible to scan the object
Check the following items:
- verify that the VGA cable is properly connected (on some PC it is not possible to detect if the cable is disconnected)
- verify that you use an Aero theme
- verify the screen configuration
- verify the power options
- verify the projector status
- verify the material of the object. If the material being scanned is metal, dark or other reflective material it is necessary to treat the object with a special spray opacifier.
- Make sure that the scanner door is closed during every scan session.
Camera LX\RX not open
Check the following items:
- verify the USB connection
- verify the device manager
After that:
- close the scanning software
- turn off the PC
- unplug the usb cable
- change usb port
- turn on the PC
- start again the scanning software
Object has moved during scanning
Check the following items:
- lock the object to the plate with the putty.
- the number of acquisitions does not allow sufficient overlap between the shots, try to increase the number of acquisitions.
The projector shines a yellow light
If the proiector shines a yellow light during the scan phase or it shines a not white light, check the following items:
- It is possible that the VGA cable is partially disconnected from the PC or from the scanner.
- verify that the VGA cable is properly connected (on some PC it is not possible to detect if the cable is disconnected).
Shipping and Transport Considerations
Remember to remove all cables carefully, remove all objects and all support plates inside the scanner before transport.
When moving the Scanner please remember to take it carefully.
Transport the Scanner in supplied Maestro 3D Packaging.
Do not flip the Maestro 3D Packaging during transport.
Avoid strong shock or vibrations during transport.
Warranty
AGE SOLUTIONS (AGE) warrants that this scanner Maestro and all products of AGE are free from defects in workmanship and material for 12 months (24 for the end user) from the date of purchase. If any failure should occur under normal and proper usage within the period of the warranty then AGE will, through its service organizations, repair the product, at no charge.
This limited warranty does not cover:
- Products for which appropriate proof of purchase by the original customer cannot be provided.
- Damage caused by incorrect use, carelessness, unauthorized alterations, improper storage, unauthorized repairs or service or damage resulting from the operation of the product by incorrect supply or signal voltages. Cleaning of internal parts when used in a smoke affected atmosphere.
- Damage originating from equipment not delivered by AGE.
- Damage originating from any operations not made by AGE.
- Damage originating from incorrect handling or other negligence by Customer, i.e., non-compliance with the operating instructions.
- Damage originating from the use of the equipment for purposes other than designated for.
- Damage originating from other cause than the ordinary use of the equipment, such as transportation or calamity of nature (i.e., lightning, fire, floods).
- Failure of the projector, or any part of the projector, due to smoke, dirt, dust or use in a smoke affected atmosphere. In such cases the warranty will be void.
- Damage to external parts.
- Lamps. These are warrantied for 6 months.
Details can also be obtained from your reseller or from our website at: [www.age-solutions.com]
Should you encounter problems operating your scanner please first contact your reseller. If this product is defective your remedy is repair as set out above.
Transport costs and customs for the withdrawal of defective goods and the shipment of repaired goods are charged to the customer.
To the maximum extent permitted by applicable law, AGE will not be liable for any damages whatsoever (including, without limitation, incidental or consequential damages) arising out of the use, or the inability to use this product even if AGE or its reseller has been advised of the possibility of such damages. This warranty is in addition to, and does not affect, your statutory rights.

