Maestro 3D Dental Studio V5 - User Manual
Contents |
Software Installation
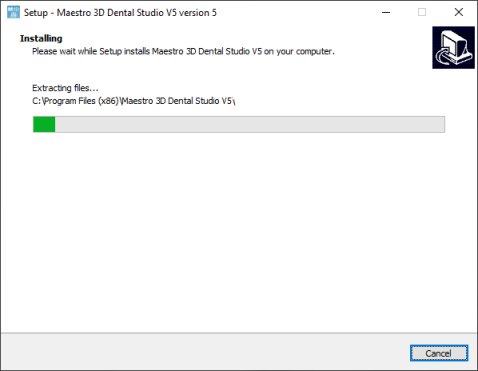
To install the software, run the installation file with administrator rights. In the various phases of the installation process, it will be possible to choose the destination folder, whether or not to add an icon to our desktop, etc. See the image below which shows an installation step.
This operation takes a few minutes.
At the end of the operation, the installation will have created two icons on the desktop ![]()
- Maestro 3D Dental Studio the CAD application;
- Maestro 3D Dental Studio Order Management the software for managing the customer database and creating a new case and opening an existing one.
Administrator rights
To execute the software correctly it is necessary to set the administrator rights correctly. Follow the instructions as shown in the pictures below. Right click on the software icon to activate the contextual menu and select the Open destination folder item.
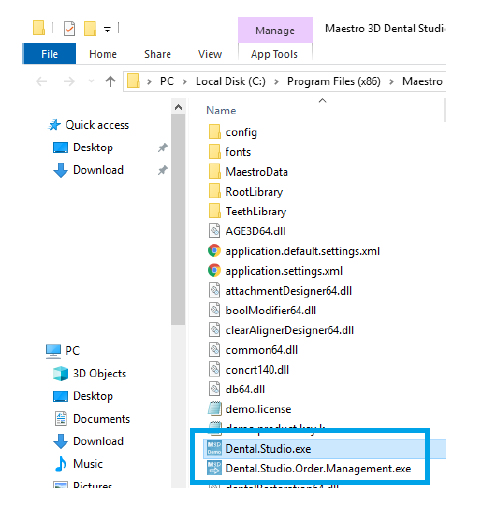
A window will appear showing the contents of the installation folder, as shown in the image below:
For both executables Dental.Studio.exe and Dental.Studio.Order.Management.exe, one at a time, right click to activate the contextual menu and select Properties.
As shown in the figure above, press the Compatibility tab and check the item Run this program as an administrator and press OK to confirm.
As a last thing, right click once again on the software icons on the desktop to activate the contextual menu and select the Properties item.
As shown in the figure below, press the Compatibility tab and check the item Run this program as an administrator and press OK to confirm.
First activation of the license
Before starting check:
- to have an internet connection;
- to have added to the exceptions list of your firewall and antivirus the executable software Dental.Studio.exe and Dental.Studio.Order.Management.exe.
At the first run the software will show a window like this:
- Product Key write the assigned and unique product code for your license;
- Mail write your email to receive confirmation of activation;
- Workstation name write the name you prefer for the workstation.
Press Next to activate the license.
Important notes on the license
The activation procedure, described above, activates the license on the workstation.
It is necessary to repeat the activation procedure each time the workstation is modified or changed. For this reason it is recommended to keep the product code.
The maximum number of workstations that can be activated is 3. However, the license cannot work simultaneously in more than one workstation.
The license, after the first activation, can work offline. The workstation may therefore not be connected to the Internet.
Only for the first activation it is necessary to use an Internet connection.
However, we recommend using the software on a workstation connected to the Internet to check for software updates.
Order Management
Dental Studio Interfaccia Utente
L'immagine sottostante mostra come appare l'interfaccia utente del software.
- 1 Barra degli strumenti principale;
- 2 Area di visualizzazione e di lavoro;
- 3 Barra laterale;
- 4 Barra degli strumenti di visualizzazione;
- 5 Area informativa.
1 - Barra degli strumenti principale
- 1 Menù File;
- controlla aggiornamenti;
- uscita dal software;
- 2 Menù Aiuto;
- guida;
- visualizza informazioni sulla versione del software e sulla licenza;
- 3 Menù Impostazioni | cambia lingua, colori, impostazioni di visualizzazione e autosalvataggio;
- 4 Menù Cattura schermo;
- 5 Menù Registra un video;
- 6 Tab Home;
- 7 Tab Analisi e Misure;
- 8 Tab Virtual Setup;
- 9 Salva progetto;
- 10 Chiudi e torna all'Order Management;
- 11 Esporta;
- esporta i modelli studio;
- esporta progetto M3D per il visualizzatore;
- 12 Sistema di riferimento;
- 13 Cambia Articolazione;
- 14 Modelli Studio | basi virtuali;
- 15 Etichette 3D sui modelli studio;
- 16 Rimozione dei brackets dalle arcate di input;
- 17 Strumento di modellazione | aggiungi, rimuovi materiale | liscia la superfice;
- 18 Note;
- 19 Viste canoniche multiple;
- 20 Raccolta immagini 2D.
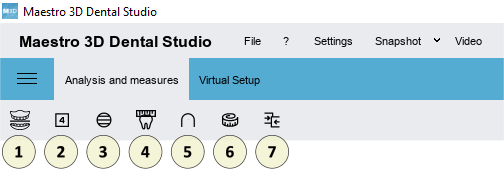
- 1 Ispezione occlusale;
- 2 4D Motion;
- 3 Sezioni 3D;
- 4 Misure mesio-distali | analisi di Bolton;
- 5 Misura della lunghezza dell'arcata;
- 6 Misure libere | punto-punto | angoli;
- 7 Comparazione 3D.
- 1 Segmentazione dei denti;
- linea di taglio singola per ogni dente;
- linea di taglio globale;
- imposta assi dei denti | centro di rotazione | punto FA | Tip, Torque iniziali;
- 2 Setup Virtuale;
- setup virtuale;
- Importa nuovi attacchi;
- 3 Posizionamento brackets;
- posizionamento brackets;
- libreria dei brackets;
- 4 Costruzione dei modelli di transizione;
- 5 Mascherine invisibili;
- mascherine invisibili;
- mascherine invisibili per posizionamento degli attachments;
- mascherine invisibili per posizionamento brackets;
- mascherine invisibili (con finestra) per posizionamento brackets;
- mascherine invisibili per posizionamento brackets con jig;
- 6 Taglia e chiudi;
- taglia e chiudi con linea;
- taglia e chiudi con piano;
- 7 Etichette 3D sui modelli di transizione;
- 8 Menù a tendina dei modelli di transizione per l'arcata superiore ed inferiore;
- 9 Animazione del trattamento e controllo della velocità;
- 10 Report PDF;
- 11 Report Video;
- 12 Esporta;
- esporta mascherine;
- esporta mascherine guida per gli attachments;
- esporta mascherina per il posizionamento dei brackets;
- esporta mascherina (con finestra) per il posizionamento dei brackets;
- esporta mascherina per il posizionamento dei brackets con jig;
- esporta modello scansionato con i le chiavi di trasferimento per i brackets;
- esporta modelli di transizione.
2 - Area di visualizzazione e di lavoro
L'area di visualizzazione e di lavoro è l'area della finestra dove i modelli 3D sono visualizzati e dove le operazioni di modifica sono consentite. Nell'area di visualizzazione è possibile visualizzare / creare le basi virtuali, visualizzare l'occlusione fra la mascella e la mandibola, visualizzare le misure dei denti, la lunghezza dell'arco e realizzare e mostrare il setup virtuale e tutte le altre fasi del lavoro.
Per esaminare i modelli visualizzati, i parametri della camera (posizione, scalatura, rotazione) possono essere settati attraverso uno strumento chiamato trackball. La trackball è uno strumento semplice da utilizzare per muovere ed interagire con la scena 3D.
- Premere e trascinare il tasto sinistro del mouse per ruotare intorno al modello;
- Ruotare la rotella centrare del mouse per effettuare lo zoom;
- Premere il tasto centrale del mouse o la rotella per cambiare il centro di rotazione della scena 3D;
- Premere e trascinare il tasto destro per muovere la camera.
3 - Barra laterale
|
4 - Barra degli strumenti di visualizzazione
- 1 Mostra\Nascondi e cambia la trasparenza dei componenti della scena 3D;
- 2 Abilita la modalità ruota o trascina per il touchscreen.
- 3 Ingrandisce [tasto PGDown] / rimpicciolisce [tasto PGUp] la scena 3D;
- 4 Resetta la vista;
- 5 Cambia la proiezione della camera che inquadra la scena 3D: proiezione parallela [tasto O], proiezione prospettica [tasto P];
- 6 Cambia le proprietà di illuminazione dei modelli 3D: smooth shading [tasto S], flat shading [tasto F];
- 7 Abilita fotorealismo;
- 8 Abilita le ombre, (solo se il fotorealismo è attivo);
- 9 Visualizza / nasconde il colore reale dei modelli 3D, se il colore reale è stato acquisito durante la scansione;
- 10 Visualizza / nasconde i triangoli;
- 11 Visualizza / nasconde i bordi dei triangoli [tasto E];
- 12 Visualizza / nasconde i punti [tasto V].
5 - Area informativa
L'area informativa che si trova nell'angolo in basso a sinistra della schermata principale, racchiude tutte le informazioni principali del caso del lavoro. Ad esempio è riportato il nome della clinica, del dottore, i dati relativi al paziente, l'identificativo del caso di lavoro e i modelli correntemente visualizzati.


