Maestro 3D Ortho Studio - User Manual
From Maestro3D
(Difference between revisions)
(→Introduction|Introduction) |
(→Software Installation|Software Installation) |
||
| Line 53: | Line 53: | ||
</div> | </div> | ||
| − | == | + | == Software Installation == |
| + | |||
| + | |||
| + | <div align="justify"> | ||
| + | To install the Maestro 3D Ortho Studio software, double click with left mouse button on the | ||
| + | file: Maestro.3D.Ortho.Studio.vx.xx.xxx.Setup.exe which is in the CD\DVD. | ||
| + | |||
| + | '''Step 1:''' Select the installation language. | ||
| + | |||
| + | <div align="center"> [[image:ortho.studio.installation1.png]] </div> | ||
| + | |||
| + | |||
| + | |||
| + | |||
| + | </div> | ||
| + | |||
== User Interface|User Interface == | == User Interface|User Interface == | ||
=== Main Toolbar|Main Toolbar === | === Main Toolbar|Main Toolbar === | ||
Revision as of 16:36, 21 May 2012
Introduction to the use of Maestro 3D Ortho Studio software
This document is intended to introduce the user, in a simple and quick way, to the use of the Ortho Studio software. Please read this manual carefully before making use of the Ortho Studio software.
Introduction
Maestro 3D Ortho Studio is a very powerful and easy to use software for orthodontics. The principal features available are:
- Patient, Surgery And Doctor info handling using AGE DB.
- Choice of local origo of mandibular and maxillary arcs.
- Virtual base creation / modification and stitching to mandibular and maxillary arcs.
- Virtual Setup.
- Occlusion inspection between mandibular and maxillary models.
- Analysis of distance, measures and sections.
Software Installation
To install the Maestro 3D Ortho Studio software, double click with left mouse button on the file: Maestro.3D.Ortho.Studio.vx.xx.xxx.Setup.exe which is in the CD\DVD.
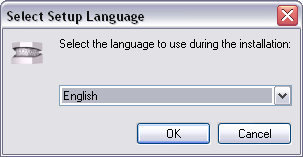
Step 1: Select the installation language.
